Are you looking to move WordPress from HTTP to HTTPS and install an SSL certificate on your website? We have been getting a lot of requests on this topic because Google announced that Chrome browser will start marking all websites without SSL as insecure starting July 2018. In this article, we will show you how to properly move WordPress from HTTP to HTTPs by adding a SSL certificate.
Don’t worry, if you have no idea what SSL or HTTPS is. We’re going to explain that as well.
What is HTTPS?
HTTPS or Secure HTTP is an encryption method that secures the connection between users’ browser and your server. This makes it harder for hackers to eavesdrop on the connection.
Every day we share our personal information with different websites whether it’s making a purchase or simply logging in.
In order to protect the data transfer, a secure connection needs to be created.
That’s when SSL and HTTPS come in.
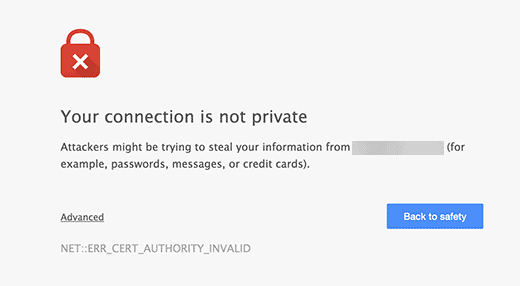
Each site is issued a unique SSL certificate for identification purposes. If a server is pretending to be on HTTPS, and its certificate doesn’t match, then most modern browsers will warn the user from connecting to the website.
Now you are probably wondering, why do I need to move my WordPress site from HTTP to HTTPS specially if it’s a simple blog or small business website that doesn’t collect any payments.
Why do you need HTTPS and SSL?
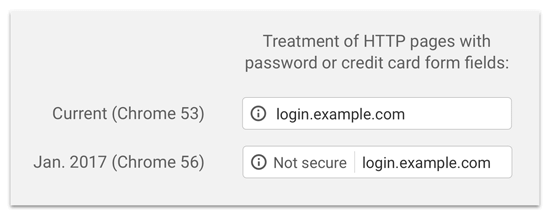
Last year Google announced a plan to improve overall web security by encouraging website owners to make the switch from HTTP to HTTPS. As part of this plan, their popular Chrome web browser would mark all websites without a SSL certificate as “Not Secure” starting July 2018.
As part of the announcement, Google also said that websites with SSL will also see SEO benefits and higher rankings. Since last year, a large number of websites have switched from HTTP to HTTPS.
Google has been slowly rolling out the “Not Secure” warning in Chrome. For example, if someone visits a HTTP website using the incognito window, it will be marked as Not Secure. If someone visits a HTTP website on regular mode and tries to fill out a contact form or another form, then the website will be marked as insecure.
When your readers and customers see this notice, it gives them a bad impression for your business.
This is why all websites need to move form HTTP to HTTPS and install SSL immediately.
Not to mention, if you want to accept payments online on your eCommerce website, then you need SSL.
Most payment companies like Stripe, PayPal Pro, Authorize.net, etc will require you to have a secure connection before accepting payments.
We use SSL for our websites including WPBeginner, OptinMonster, WPForms, and MonsterInsights.
Requirements for using HTTPS/SSL on a WordPress Site
The requirements for using SSL in WordPress is not very high. All you need to do is purchase an SSL certificate, and you might already have it for free.
The best WordPress hosting companies are offering free SSL certificates for all their users:
For more details, see our guide on how to get a free SSL certificate for your WordPress website.
If your hosting company does not offer a free SSL certificate, then you’ll need to purchase an SSL certificate.
We recommend using GoDaddy because they are the largest domain name registration service in the world, managing more than 76 million domains.
By purchasing a SSL certificate from them, you also get a McAfee secure seal for your website.
Once you have purchased an SSL certificate, you will need to ask your hosting provider to install it for you.
Setting up WordPress to Use SSL and HTTPs
After you have enabled SSL certificate on your domain name, you will need to set up WordPress to use SSL and HTTPs protocols on your website.
We will show you two methods to do that, and you can choose one that best fits your need.
Method 1: Setup SSL/HTTPS in WordPress Using a Plugin
This method is easier and is recommended for beginners.
First, you need to install and activate the Really Simple SSL plugin. For more details, see our step by step guide on how to install a WordPress plugin.
Upon activation, you need to visit Settings » SSL page. The plugin will automatically detect your SSL certificate, and it will set up your WordPress site to use HTTPs.
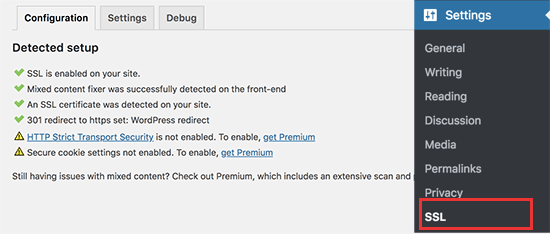
The plugin will take care of everything including the mixed content errors. Here’s what the plugin does behind the scenes:
- Check SSL certificate
- Set WordPress to use https in URLs
- Set up redirects from HTTP to HTTPs
- Look for URLs in your content still loading from insecure HTTP sources and attempt to fix them.
Note: The plugin attempts to fix mixed content errors by using output buffering technique. It can have a negative performance impact because it’s replacing content on the site as the page is being loaded. This impact is only seen on first-page load, and it should be minimal if you are using a caching plugin.
While the plugin says you can keep SSL and safely deactivate the plugin, it’s not 100% true. You will have to leave the plugin active at all times because deactivating the plugin will bring back mixed content errors.
Method 2: Setup SSL/HTTPS in WordPress Manually
This method requires you to troubleshoot issues manually and edit WordPress files. However this is a permanent and more performance optimized solution. This is what we’re using on WPBeginner.
If you find this method difficult, then you can hire a WordPress developer or use the first method instead.
As part of this method, you may need to edit WordPress theme and code files. If you haven’t done this before, then see our guide on how to copy and paste code snippets in WordPress.
First, you need to visit Settings » General page. From here you need to update your WordPress and site URL address fields by replacing http with https.
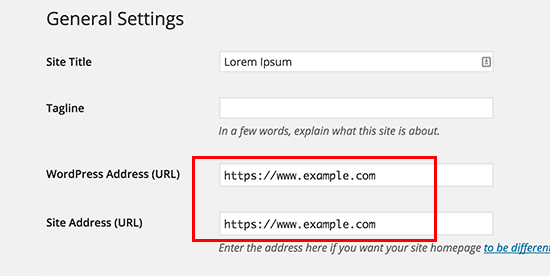
Don’t forget to click on the ‘Save changes’ button to store your settings.
Once the settings are saved, WordPress will log you out, and you will be asked to re-login.
Next, you need to set up WordPress redirects from HTTP to HTTPS by adding the following code to your .htaccess file.
<IfModule mod_rewrite.c>
RewriteEngine On
RewriteCond %{SERVER_PORT} 80
RewriteRule ^(.*)$ https://www.example.com/$1 [R,L]
</IfModule>
Don’t forget to replace example.com with your own domain name.
If you are on nginx servers (most users are not), then you would need to add the following code to redirect from HTTP to HTTPS in your configuration file:
server {
listen 80;
server_name example.com www.example.com;
return 301 https://example.com$request_uri;
}
Don’t forget to replace example.com with your own domain name.
By following these steps, you will avoid the WordPress HTTPS not working error because WordPress will now load your entire website using https.
If you want to force SSL and HTTPS on your WordPress admin area or login pages, then you need to configure SSL in the wp-config.php file.
Simply add the following code above the “That’s all, stop editing!” line in your wp-config.php file:
define('FORCE_SSL_ADMIN', true);
This line allows WordPress to force SSL / HTTPs in WordPress admin area. It also works on WordPress multisite networks.
Once you do this, your website is now fully setup to use SSL / HTTPS, but you will still encounter mixed content errors.
These errors are caused by sources (images, scripts, or stylesheets) that are still loading using the insecure HTTP protocol in the URLs. If that is the case, then you will not be able to see a secure padlock icon in your website’s address bar.
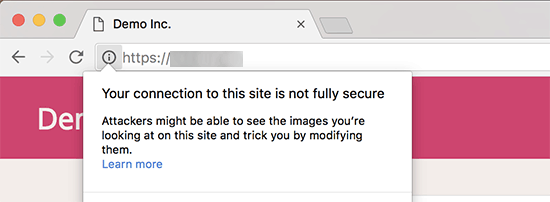
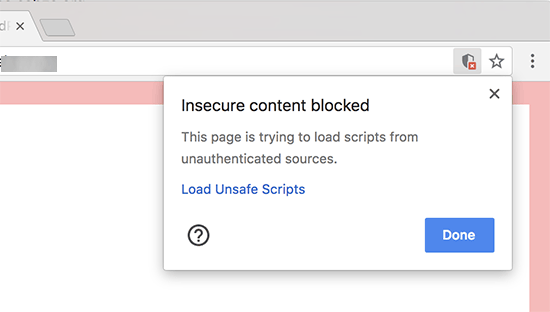
Many modern browsers will automatically block unsafe scripts and resources. You may see a padlock icon but with a notification about it in your browser’s address bar.
You can find out which content is served through insecure protocol by using the Inspect tool. The mixed content error will be displayed as a warning in the console with details for each mixed content item.
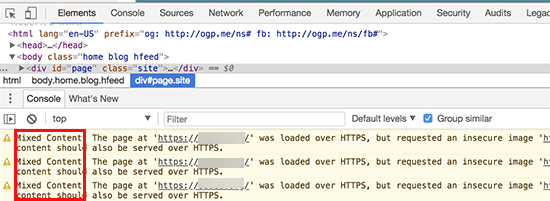
You will notice that most URLs are images, iframes, and image galleries while some are scripts and stylesheets loaded by your WordPress plugins and themes.
Fixing Mixed Content in WordPress Database
Majority of the incorrect URLs will be images, files, embeds, and other data stored in your WordPress database. Let’s fix them first.
All what you need to do is find all mentions of your old website URL in the database that started with http and replace it with your new website URL that starts with https.
You can easily do this by installing and activating the Better Search Replace plugin. For more details, see our step by step guide on how to install a WordPress plugin.
Upon activation, you need to visit Tools » Better Search Replace page. Under the ‘Search’ field, you need to add your website URL with http. After that, add your website URL with https under the ‘Replace’ field.
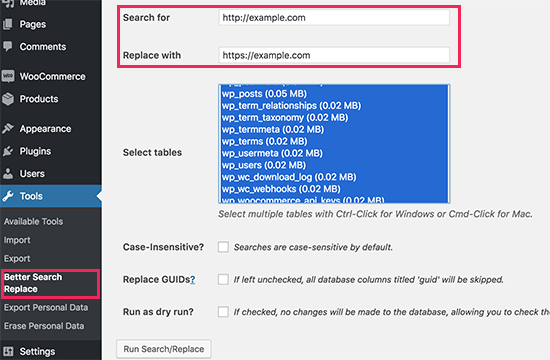
Below that, you will see all your WordPress database tables. You need to select all of them to run a thorough check.
Lastly, you need to uncheck the box next to ‘Run as dry run?’ option, and then click on ‘Run Search/Replace’ button.
The plugin will now search your WordPress database for URLs starting with http and will replace them with secure https URLs. It may take a while depending on your WordPress database size.
Fixing Mixed Content Errors in WordPress Theme
Another common culprit causing mixed content error is your WordPress theme. Any decent WordPress theme following WordPress coding standards will not cause this issue.
First, you will need to use your browser’s Inspect tool to find the resources and where they are loading from.
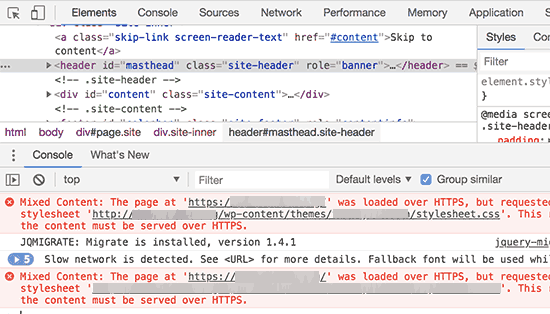
After that, you will need to find them in your WordPress theme and replace them with https. This will be a little difficult for most beginners, as you will not be able to see which theme files contain these URLs.
Fixing Mixed Content Errors Caused by Plugins
Some mixed content resources will be loaded by WordPress plugins. Any WordPress plugin following WordPress coding standards will not cause mixed content errors.
We don’t recommend editing WordPress plugin files. Instead, you need to reach out to the plugin author and let them know. If they do not respond or are unable to fix it, then you need to find a suitable alternate.
Note: If for some reason, you’re still encountering mixed content error, then we recommend using the Really Simple SSL plugin temporarily, so your users are not impacted while you fix the issue on a staging website or hire a developer.
Submit Your HTTPS Site to Google Search Console
Search engines like Google consider https and http as two different websites. This means you will need to let Google know that your website has moved to avoid any SEO issues.
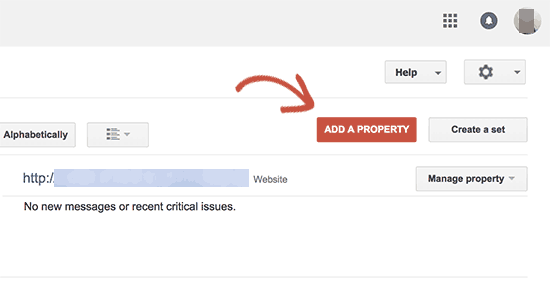
To do that, you just need to go to your Google Search Console account and click on ‘Add a Property’ button.
This will bring up a popup where you need to add your website’s new https address.
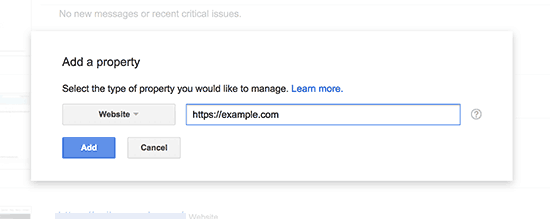
After that, Google will ask you to verify ownership of your website. There are several ways to do that, select any method and you will instructions to verify your site.
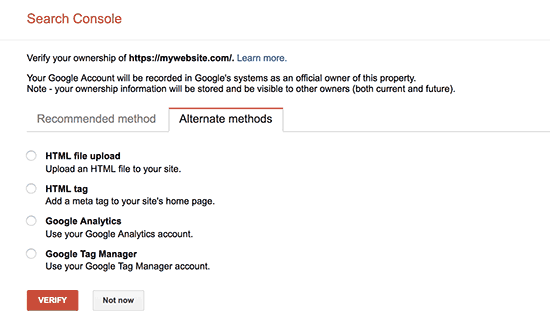
Once your site is verified, Google will start showing your search console reports here.
You also need to make sure that both the https and http versions are added in your Search Console.
Once you have both versions, you need to go to the http version in your Google Search Console and click on the Settings Menu. From there, you need to select “Change of Site Address” option.
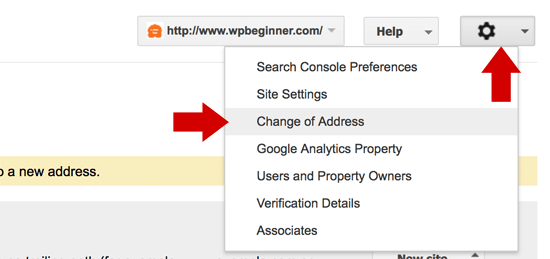
Google will automatically select your new site in the field below, but if it doesn’t, then you need to select the https version of your website and then submit the change of address request.
This tells Google that you want the https version of your website to be treated as the primary version. Combined with the 301 redirects that you setup earlier, Google will transfer your search rankings to the https version of your website, and you will most likely see improvements in your search rankings.
We know that we did when switched our websites from http to https.
We hope this article helped you add HTTPS and SSL in WordPress. You may also want to see our ultimate WordPress security guide with step by step instructions to keep your WordPress site secure.
If you liked this article, then please subscribe to our YouTube Channel for WordPress video tutorials. You can also find us on Twitter and Facebook.
The post How to Properly Move WordPress from HTTP to HTTPS (Beginner’s Guide) appeared first on WPBeginner.
from WPBeginner https://ift.tt/2NLtrUL
via IFTTT
No comments:
Post a Comment