Do you want to get Slack notifications based on certain activity on your WordPress site?
Slack has become a central communication platform for many online businesses. Having activity notifications like new sales, new leads, new blog posts, etc. inside Slack can be helpful in streamlining your business workflows.
In this article, we’re going to show you how to easily get Slack notifications from your WordPress site.
Why Get Slack Notifications From Your WordPress Site?
Getting Slack notifications for key events on your WordPress site lets you keep everyone informed and even respond to certain things quickly.
For instance, you might want to get a Slack notification when your site’s contact form is completed. Or you may want a notification if a product in your online store is low on stock.
We’re going to take you through several different ways to set up Slack notifications from your WordPress site.
You can simply use the navigation links to jump straight to the section you want.
- Get a Slack Notification When a New Post is Published (Slack’s RSS App)
- Setting Up the Slack Notifications Plugin
- Get a WooCommerce Sales Notification in Slack (Slack Notifications Plugin)
- Get a Slack Notification for Plugin Updates (Slack Notifications Plugin)
- Get New Comment Notifications in Slack (Slack Notification Plugin)
- Get a Slack Notification When a WordPress Contact Form / Lead Form is Submitted (Zapier)
Get a Slack Notification When a New Post is Published
If you run many WordPress blogs like we do, then you may want to keep your team informed on all the new article updates that are going live.
Alternatively, you may want to keep your team briefed on all the new things happening in your industry (competitor updates, thought leaders, etc).
This is where Slack notifications can help. You can simply create a new channel that gets RSS feed updates from your favorite sites.
First, go to the RSS app page in Slack’s App Directory then click the ‘Add to Slack’ button.
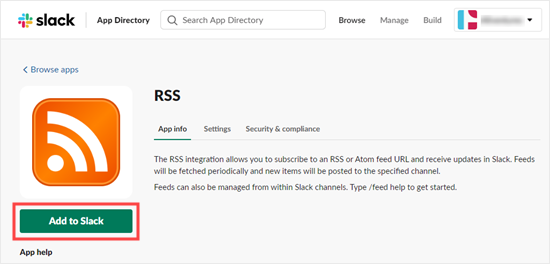
Next, click the ‘Add RSS integration’ button.

Now, you need to enter the URL of the feed you want to add and choose which Slack channel you want to post notifications to. Once you’ve entered these details, click the ‘Subscribe to this feed’ button.
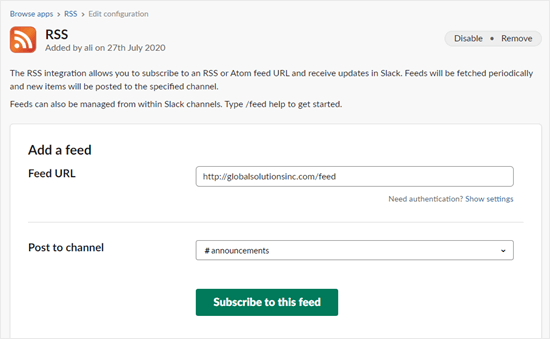
The app will then fetch and display your RSS feed title on screen.
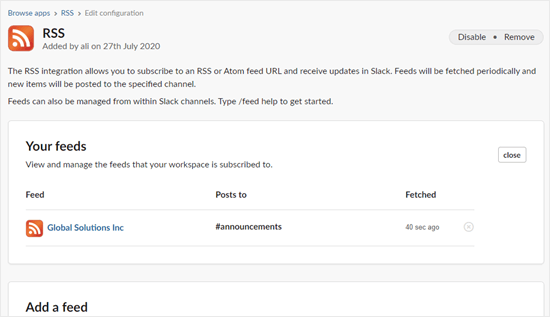
If you run multiple WordPress sites, then you can add more feeds as needed.
Tip: You don’t have to own the RSS feed. You could use the RSS app to keep an eye on your competitors’ sites or stay on top of news from other blogs in your industry.
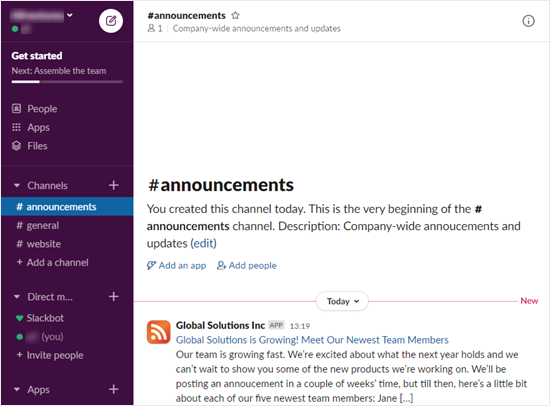
You will now automatically get a notification in your chosen Slack channel when a new post is published. The app checks for new items every few minutes, which means these notifications may not appear instantly.
Setting Up the Slack Notifications WordPress Plugin
If you want Slack to notify you about new posts, comments, WooCommerce orders, and other activity on your site, then you need to use the Slack Notifications plugin.
First, you need to do install and activate the Slack Notifications plugin. For more details, see our step by step guide on how to install a WordPress plugin.
Upon activation, click the Slack Notifications link at the bottom of your WordPress admin sidebar. You will see the Slack Integration page.
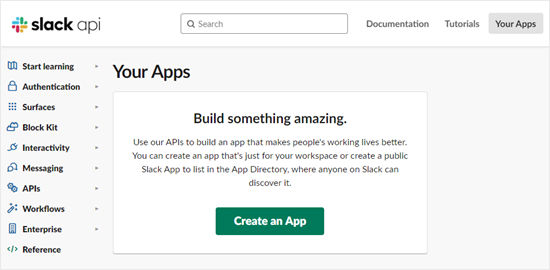
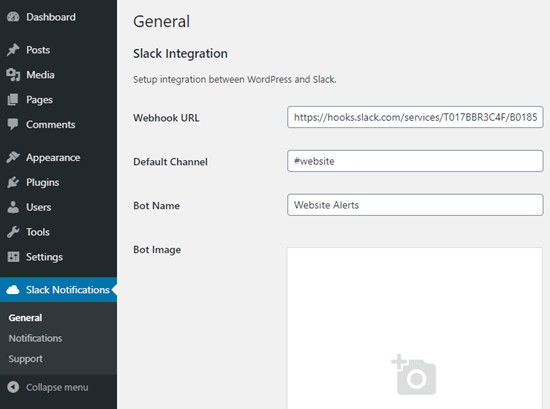 apps page on Slack and click the ‘Create an App’ button:
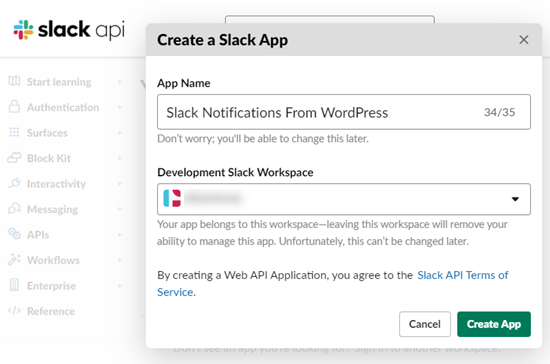
Next, enter a name for your app and choose your workspace from the drop-down list. Then, go ahead and click the ‘Create App’ button:
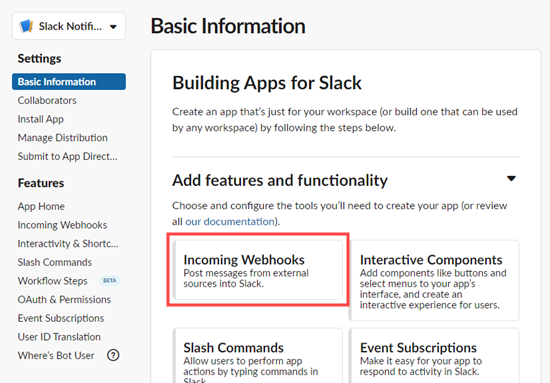
You’ll now see a page titled Basic Information. Here, you need to click on the ‘Incoming Webhooks’ section.
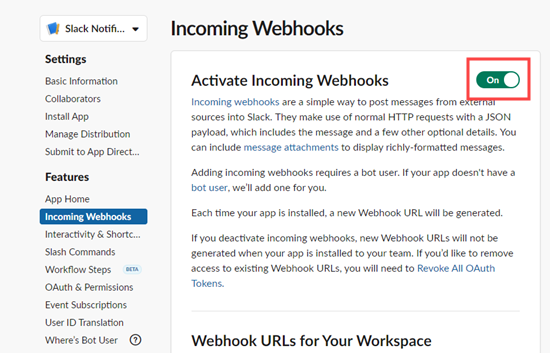
On the next screen, switch the ‘Activate Incoming Webhooks’ slider to the ‘On’ position:
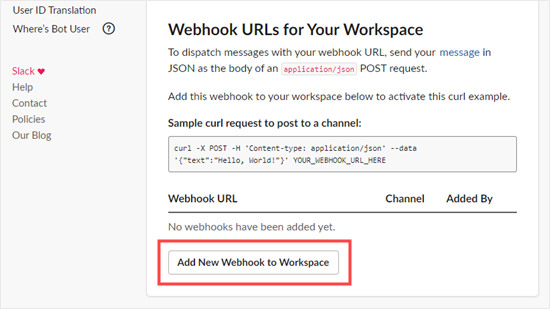
After that, you need to scroll down the page and click on the ‘Add New Webhook to Workspace’ button:
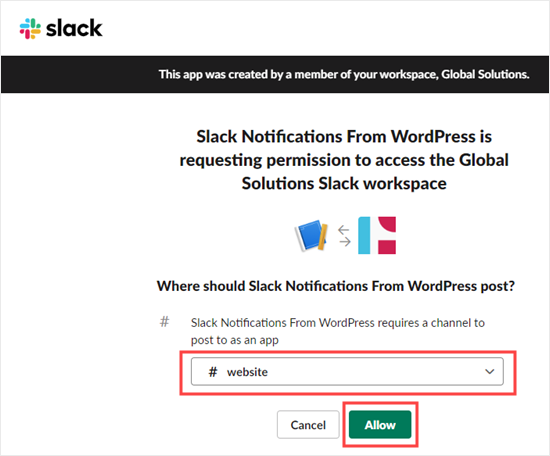
Slack will now prompt you to select the channel from a drop-down list. You need to click the ‘Allow’ button to give the app permission to post to it:
You will now see the previous page again, with your webhook in place. Simply copy this or leave the tab open, as we will need it in a moment.
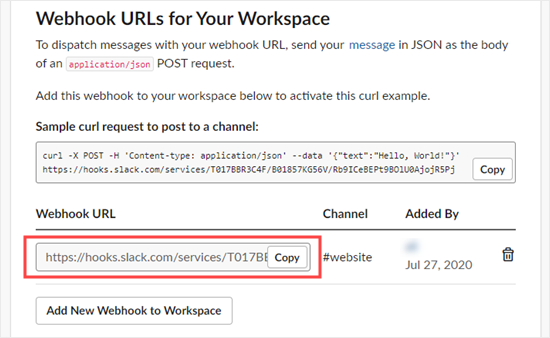
Now you need to switch back to your WordPress site’s Slack Notifications settings page. On this page, go ahead and copy / paste the webhook URL you created earlier, enter the default channel, and the bot name that you want to use.

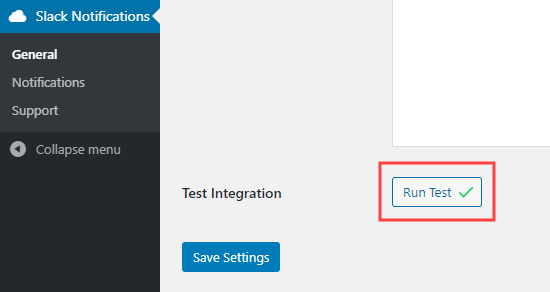
After that, you need to scroll down the page and click on the ‘Run Test’ button at the bottom.
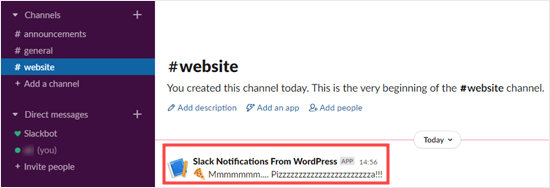
You should get a notification into your Slack channel like this. The app will have the name you gave it when setting it up in Slack.
Don’t forget to click the ‘Save Settings’ button at the bottom of the page, too.
The Slack Notifications plugin is correctly connected. The next step is to set up notifications from your WordPress site.
To set up any notification, you need to go to Slack Notifications » Notifications in your WordPress admin. Click the ‘Add New’ button at the top of the screen:
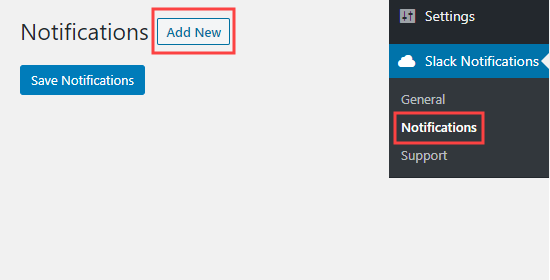
We will go through several different useful options that you may want to use.
Get a WooCommerce Sales Notification in Slack
Are you running an online store with WooCommerce? Typically you can setup new sale notifications via email, but did you know that you can setup WooCommerce sales notification in Slack too?
With the Slack Notifications plugin, you can get a message to your chosen channel whenever a new WooCommerce order comes in.
First, make sure you’ve followed the instructions above to set up Slack Notifications correctly.
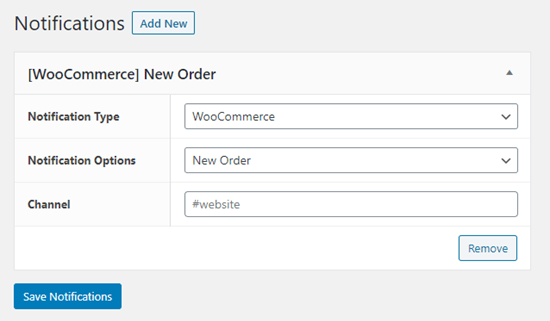
Then, simply set up WooCommerce notifications by going to Slack Notifications » Notifications and clicking on the ‘Add New’.
You’ll see several drop-downs. Go ahead and set ‘Notification Type’ to ‘WooCommerce’ and leave ‘Notification Options’ set to ‘New Order’. After that, click the ‘Save Notifications’ button.
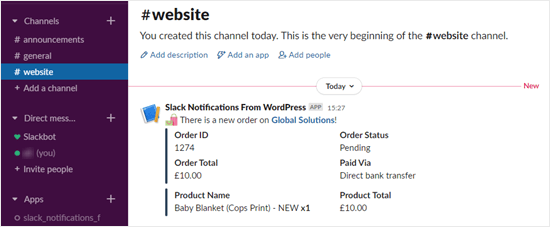
You should now get a notification in Slack whenever a new order comes in. This will include the order ID, status, total, and payment method. It will also include the item(s) purchased.
Note: The notification will not include any personal details such as the customer’s name or address.
Get a Slack Notification for Plugin Updates
Outdated plugins can be a serious risk to the security of your WordPress site. As a business owner, sometimes you might get busy and forget to update plugins, especially if you run multiple websites.
The Slack Notifications plugin lets you get a notification whenever a plugin needs updating.
First, you need to install, activate, and set up the plugin, as shown above. Then, go to Slack Notifications » Notifications in your WordPress admin and click the ‘Add New’ button.
For the ‘Notification Type’ select ‘System’ and for the ‘Notification Options’ select ‘Plugin Update Available’. After that click, Save Notifications button.
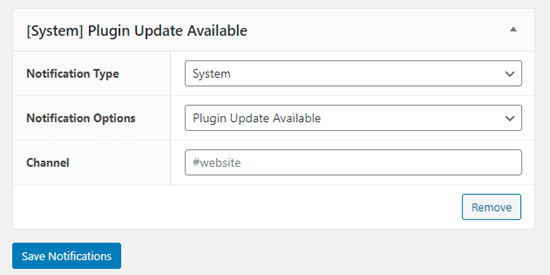
You’ll receive a notification in Slack whenever a plugin needs updating:

Note: You can also set up an alert for theme updates and core WordPress updates in the same way.
Get New Comment Notifications in Slack
The Slack Notification plugin also lets you easily get notified of new comments on your WordPress site.
Simply install, activate, and set up the plugin, as shown above. Then, go to Slack Notifications » Notifications in your WordPress admin and click the ‘Add New’ button.
Next, you need to set the Notification Type to ‘Comments’. The Notification Options drop-down should default to ‘New Comment’. After that, simply click the ‘Save Notifications’ button at the bottom.
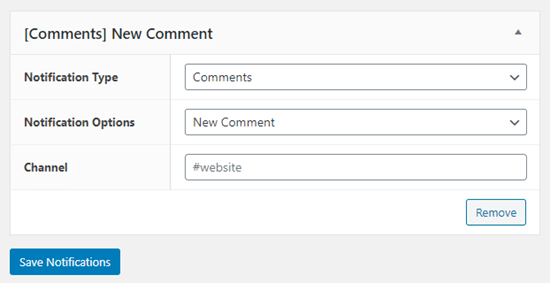
You’ll now receive a notification in Slack for each new comment on your site. This will include a link to the post being commented on, the commenter’s name and email address, and the text of their comment:
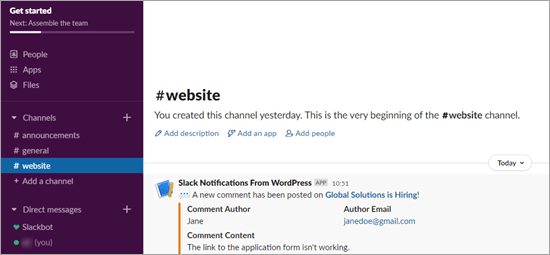
There are lots of other ways you could use the Slack Notification plugin to stay aware of what’s happening on your WordPress site.
For instance, you could get a notification every time a page is updated, every time a new post is scheduled, and so much more.
Get a Slack Notification When a WordPress Contact Form / Lead Form is Submitted
Often business owners want to immediately respond to new sales / lead form inquiries. You can connect just about every WordPress contact form to Slack using a tool called Zapier.
Zapier is like a bridge that lets you connect two apps, such as WPForms and Slack. It works with over 2,000 different apps. For the sake of this example, we’ll use WPForms which is the #1 rated WordPress form plugin.
First, you’ll need to install and activate the WPForms plugin. For more details, see our step by step guide on how to install a WordPress plugin.
Note: you’ll need at least the Pro version of WPForms to use the Zapier addon.
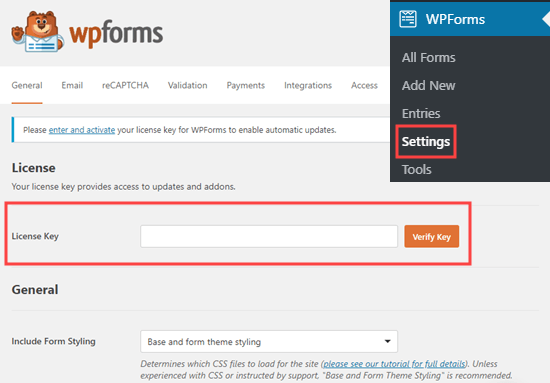
Upon activation, go to the WPForms » Settings page to enter your license key. You will find the license key in your account section on the WPForms website.
Next, go to the WPForms » Addon page. Find the Zapier addon, then go ahead and install and activate it.

Once you’ve installed that addon, go to the WPForms » Settings » Integrations page. Simply click on the Zapier logo here, and you’ll see your Zapier API key.
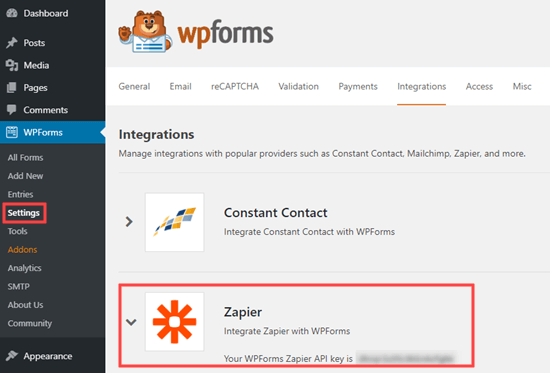
You need this to connect Zapier and WPForms, so copy it somewhere safe or keep this tab open in your browser.
You then need to set up a form and submit a test entry. We’re going to use the ‘Suggestion Form’ template as the basis of our form.
You can follow our instructions on creating a form in WPForms for help getting your form set up.
You will also need an account with both Zapier and Slack. In your Slack workspace, you need to add the Zapier app.
Then, you can create your Zap. Login to Zapier and click the ‘Make a Zap’ button on the top-left to start the configuration wizard.

In Zapier, a ‘zap’ is a process with a trigger and an action. Our trigger will be someone completing the form, and our action will be to send a Slack message.
At the top of the screen, go ahead and give your zap a name. After that, we need to set up the trigger.
In the ‘Choose App & Event’ box, simply type ‘WPForms’ into the search bar and click on the WPForms icon that appears.
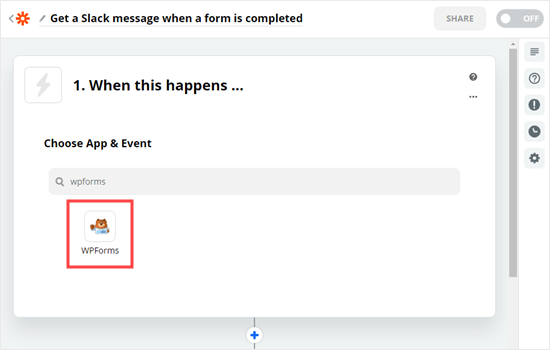
Zapier should automatically fill in the trigger event ‘New Form Entry’, so you just need to click the ‘Continue’ button.
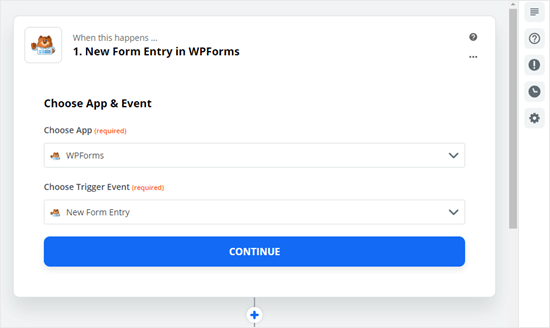
You’ll then be asked to log in to your WPForms account. Simply click on the ‘Sign in to WPForms’ button:

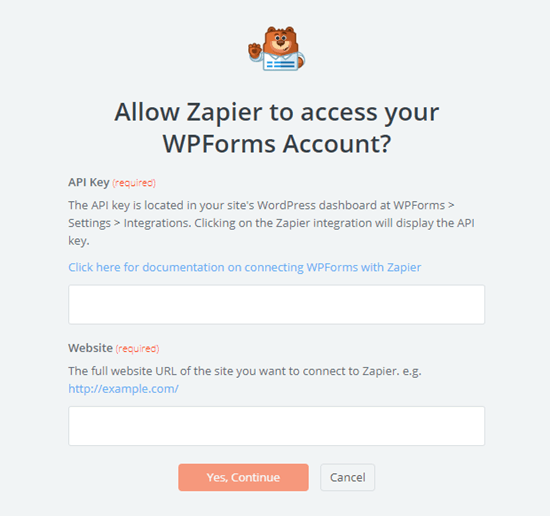
Next, you’ll see a popup window. Here, you need to copy the API key from WPForms that you found earlier. You also need to enter the URL (domain name) of your website. Once you’ve entered these, click the ‘Yes, Continue’ button.
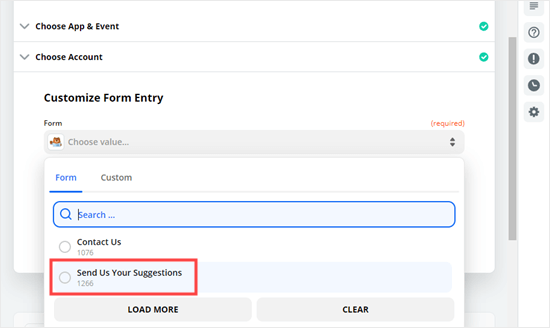
On the next step, Zapier will ask you to choose your form from a drop-down list. Just click on the form that you want to use, then click the ‘Continue’ button.
You will now be prompted to test your trigger. Click the ‘Test trigger’ button so that Zapier can look for your test entry.
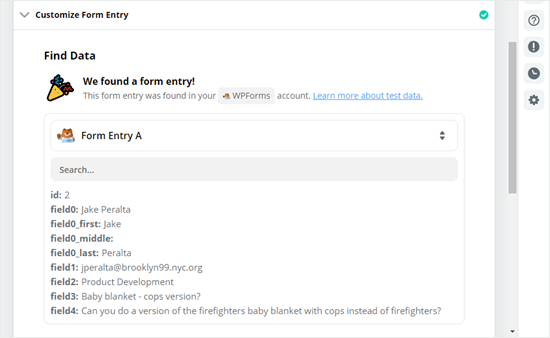
Once Zapier has found your test data, go ahead and click the ‘Continue’ button.
For the ‘Do this’ action part of the Zap, you need to choose Slack as your app. Simply type ‘Slack’ into the search bar and then click on the Slack app:
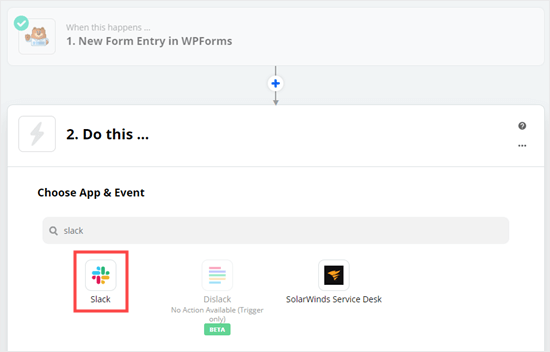
Next, you need to choose your Action Event. We’re going to choose ‘Send Channel Message’ here.
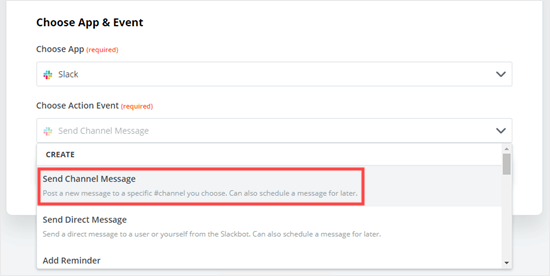
Tip: There are several other actions you could choose instead. For instance, you could trigger a direct message or a reminder.
Now, click the ‘Continue’ button. You will then be prompted to sign in to Slack. Simply follow the on-screen prompts to sign in and give Zapier permission to access your Slack workspace.
Once you’ve connected your Slack account, click the Continue button again to move on.
You’ll then be prompted to pick a channel from the drop-down list. We’ve chosen ‘website’ for ours.
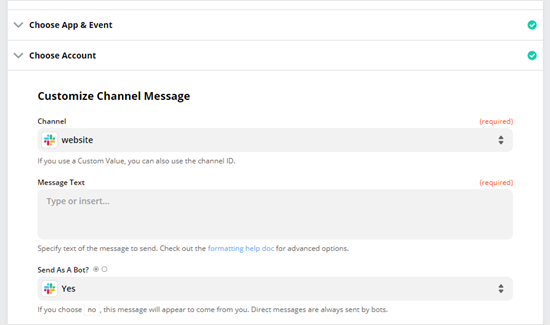
Next, you’ll need to enter the text for the notification.
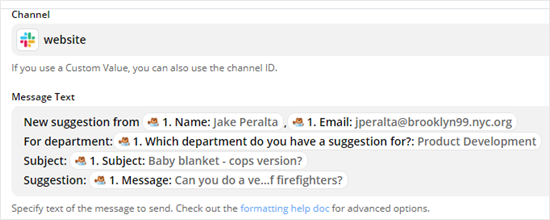
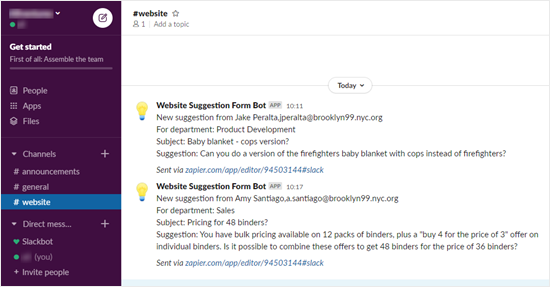
You can include the details of the form submission, as we’ve done here. When you click on the box, you’ll see your form fields in a drop-down below. Go ahead and add whichever fields you want to the message.
Tip: The name of the fields will not be included in the Slack notification. We have added some text before each field to help make the message clear.
Now, you need to give your bot a name. You may also want to choose an emoji. You can leave the other options as their defaults.
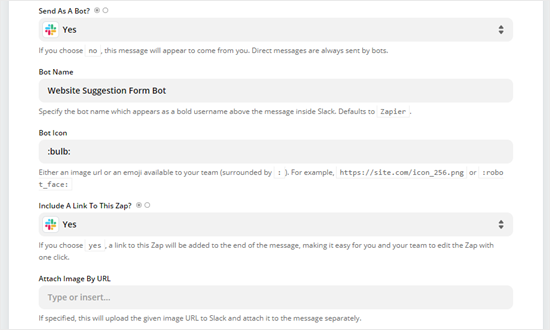
Once you are ready, click the ‘Continue’ button to move on.
It’s time to try out your app. Go ahead and click the ‘Test & Review’ button.
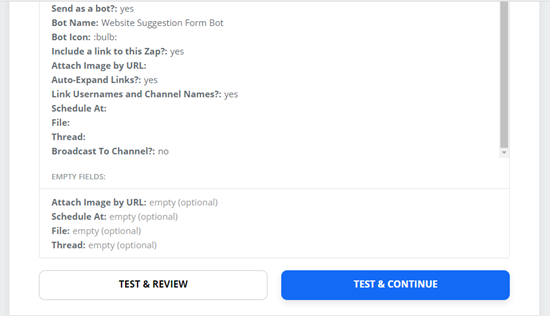
Zapier will send your test data to Slack. Go ahead and check Slack to see if your message came through as expected. If there is anything you want to change, you can go back and do so.
Once you’re happy with the Zap, simply click the ‘Turn on Zap’ button.
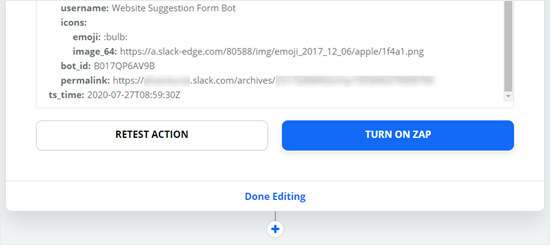
You may also want to send a new test entry through your form to ensure it appears correctly in Slack. Here is our Slack channel with our first test message plus a second one submitted after the Zap was turned on:
You can use Zapier to connect just about every email marketing service, marketing automation tool, and other business tools with each other as well as Slack.
The process is roughly similar to what we have demonstrated above with WPForms.
When used properly, Slack Notifications can significantly streamline your workflow by centralizing all the important things inside the central communication platform for your business.
We hope this article helped you learn how to get Slack notifications from your WordPress site. You might also be interested in our articles on the best business phone services for small business, and the best live chat software to get more sales / improve support.
If you liked this article, then please subscribe to our YouTube Channel for WordPress video tutorials. You can also find us on Twitter and Facebook.
The post How to Get Slack Notifications From Your WordPress Site appeared first on WPBeginner.
from WPBeginner https://ift.tt/2Dh9ggN
via IFTTT
No comments:
Post a Comment