Negotiating contracts, writing invoices, and managing taxes are scary thoughts for most freelancers.
The good news?
Taking care of the legal requirements of self-employment doesn’t have to be a nightmare.
In this bookmarkable guide, we’ll go over:
- The Ins and Outs of the Freelance Contract
- Everything You Need to Know About Freelance Invoices
- Freelance Taxes 101: The What, When, Where, and Why
We’ll even give you a freelance contract template you can use.
The goal is to provide a roadmap for how to stay on top of your legal duties as a freelance writer, developer, designer, marketer, photographer, or any other freelancer.
Let’s dive in.

The Ins and Outs of the Freelance Contract (Plus, a Freelance Contract Template!)
When engaging in any client work, having a solid contract is essential. It’s the central document that governs the independent contractor/client relationship.
Too many freelancers want to skip this part and get right into the work. While that is an admirable attitude, it’s also a good way to invite disaster.
Without a contract agreement in place, the chances for misunderstandings, scope creep, non-payment, and other unpleasantries down the line increase exponentially. Therefore, contracts represent an absolutely essential safety net no freelancer should go without.
The Goals of a Freelance Contract
While you might think that you don’t want to “bother your clients” or that “they seem so nice, surely this legal formality is not necessary”, there are many good reasons why having a clear contract in place is a good thing — for both parties.
1. Get on the Same Page
Technically, you don’t have to have a freelance contract. In theory, you can rely on your email chain with the client, which is also a written agreement. However, one bound to lead to misunderstandings.
Email communication is often too vague to figure out all the minute details that are necessary for a successful work relationship. You and your client easily end up working under slightly or very different assumptions. This quickly leads to disappointments and a business liaison gone sour.
On the other hand, with a clear-cut agreement, both you and the company or individual you decide to work with know exactly what you are getting into. Each of you have a clear idea of what your relationship entails, leaving no room for ambiguity or misunderstandings. Plus, it protects you from one-sided arrangements, such as that would lock you in with a single client and no possibility to work for others at the same time.
2. Set the Right Expectations
As mentioned, a freelance contract is not just for your benefit — it protects all parties involved:
- Clients know what work will be delivered and in what timeframe
- You know how much you will be paid, in what way, and when
The freelance agreement might also include rules for communication, e.g. that the client has to get back to you within two business days. No more waiting for assets!
In short, a contract sets a standard of your work together. That way, you both know what is expected of you and what you can expect from the other party. Furthermore, when either of you wants to change something about the relationship or if you have a dispute, you both have a document you can point to.
3. Scare Off Shady Clients
In addition to the above, a freelance contract is a great way to qualify potential clients. Asking them to add their signature to a legal document is a good way to make sure they are ready to put their money where their mouth is.
If they are not willing to do that, the best idea is to not work with them until they are, or, in some cases to not work with them at all. Otherwise, you open yourself up to the risk of not getting paid for your services or facing demands for unpaid revisions and other requests. The written agreement governs all of this and more.
In addition, having your own freelance contract template makes you look more professional. When you send over a detailed, well-formulated agreement, you clearly know what you are doing and signal trustworthiness.
In short, a contract is a good way to keep both parties happy. Without one in place, you are leaving yourself open to miscommunication, non-paying clients, and legal troubles. Plus, a signed document is a much better basis to take legal action from, if necessary.
How to Create a Reusable Freelance Contract Template
So, now that you know why you should always use a contract when engaging in freelance work. A great way to cut down on the time it takes to hammer out an agreement is to create your own freelance contract template.
It eliminates the need to start from scratch with each new client. Instead, you can simply make a copy of your existing template, change the details and you are good to go.
While we have prepared a downloadable freelance contract template further below, it’s important that we go over what your own template should contain and the important pitfalls to avoid when you tweak it to your needs.
Let’s do that now.
1. Keep it Simple
While it’s necessary that your contract protects you from all kinds of misfortune, you should keep it as simple as possible.
Why?
Because sending your new client a 20-page document they need to slog through in order to work with you is a good way to never hear from them again.
A better idea is to focus on the essentials and avoid trying to prepare for every single eventuality that might ever occur.
This kind of simplicity also applies to the contract language. While legalese might feel more “professional”, it can also be confusing and lead to misunderstandings. Here’s how to avoid that:
- Explain phrases — If there are any jargon or special contract terms not everyone might be familiar with, be sure to include a definition before using them throughout the freelance contract.
- Use clear, simple language — You might be aware that, in writing, clarity is key. Well, a contract is also written, so the same rules apply. Don’t use more complicated wording where less will do.
- Use good formatting — Just like in blogging, formatting makes contract language easier to consume and retain. Consequently, use paragraphs, bullet points, numbers, and other formatting options to provide clarity.
- State clear numbers — Be concise about amounts, time frames, etc. and don’t leave them up for interpretation. For example, instead of “at the beginning of the month”, “get back swiftly”, or “post of average length”; say “fifth of the month”, “answer within 48 hours”, and “article length between 2,000 and 3,000 words”.
As you can see, a freelance contract doesn’t have to be overly complicated. Just be clear and thorough.
2. Include a Clear Introduction
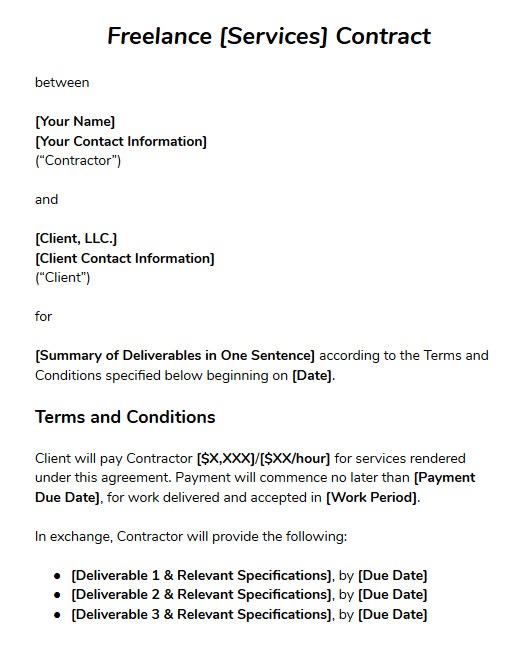
The beginning of the contract has three purposes: introduce the nature of the agreement, the parties that will be entering into it, and its main content.
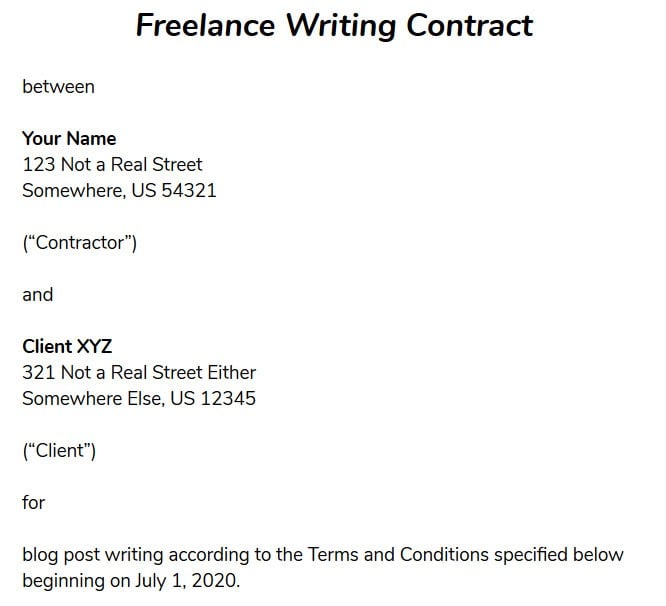
(Don’t worry about manually copying what’s in the screenshot, you can download a sample freelance contract template below where these are taken from.)
The beginning of the contract has three purposes: introduce the nature of the agreement, the parties that will be entering into it, and its main content.
Consequently, we will start with the title of what you will be doing. This can be something like “Freelance Web Design Contract”, “Blog Contributor Agreement”, “Online Marketing Consulting”, or simply “Letter of Agreement”.
Another good format is a simple “Freelance [Services] Contract for [Client Name]”.
After that, name both parties with full names (including their legal titles like “LLC” or “Inc.”), business addresses, and contact information. The introduction also serves to establish the designations as “Client” and “Contractor” that will be used throughout the document. That way, you don’t have to copy and paste each name a dozen times and it makes it easier to reuse the freelance contract template.
Next, provide an overview of what you will be doing for the client.
Don’t go overboard here, we will deal with the specifics later. What’s important, however, is that you don’t forget to include the starting date (that you both have agreed upon) for your services. This can also simply be the day that the client signs the agreement.
3. Establish Terms and Deliverables
This part is where you lay out the key signposts of the client relationship. A central part for you here is payment: how much you will receive, in what way, and at what time.
It’s important to be specific so that, if the client attempts to pay less or skip paying altogether, you have clear leverage.

After that, it’s time to talk about what kind of work you will do for that money — your deliverables. Here, too, it pays to be specific in what duties you will be performing, the work product you commit yourself to deliver, and the deadlines for when you will do so.

Make sure to avoid any ambiguity. There should be no grounds for interpretation or confusion that could lead to conflict. For example, if you’re offering freelance writing services, you would include details like:
- Number of articles per week/month
- Approximate word count per post
- Day and mode of delivery (e.g. file type)
- Additional duties you will be performing, such as helping with promotion
Here’s an example of what that looks like:

This, too, can be broken down into milestones, if necessary. Doing so especially makes sense for larger freelance projects where you will deliver different parts at different times.
4. Define the Project Scope of Work
We already talked about the dangers of scope creep earlier. In case you are not familiar with this term, scope creep means that a client or some other stakeholder in a project asks for additional tasks, deliverables, revisions, or similar before the end of the project.
Basically, it’s anything that creeps beyond the initially agreed upon scope of the project (hence the name).
Of course, if you have a good working relationship, it’s completely reasonable to do a little extra work for a client. In fact, “underpromise and overdeliver” is a pretty good strategy to be successful as a freelancer.
However, it’s important to not let it get out of hand so you end up doing a lot of additional work for no remuneration. To avoid that, the freelance contract needs to clearly lay out what is and isn’t part of the scope of the agreement.
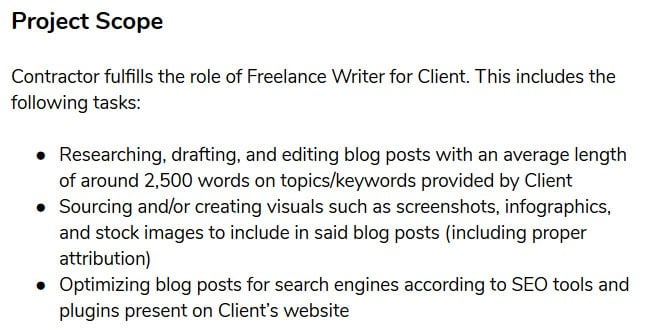
Get really specific here and don’t leave room for interpretation. If someone hires you as an editor, you don’t want to end up writing their posts for them. If you are a web designer, you can’t be expected to create a social media strategy for a website. And so on.
Defining the project scope also marks the endpoint for the client relationship. Once you have done your part, the contract is fulfilled and it’s time for payment. If the client wants additional tasks done, that needs to be part of another freelance contract, not a silent addendum to the first one.
Final note: If you have a highly technical job that would need a very long description and would make the contract annoyingly long, or if your services change widely from client to client, it can also make sense to write out the scope in a separate project plan.
That way, you don’t have to change the contract template all the time — you can simply include a reference that you will perform the services described in the attached plan.
5. Regulate Changes and Revisions
Speaking of changes to scope, your contract needs to account for that eventuality as well. This requires a section that lays out how additional tasks, requests, and changes to the original agreement will be dealt with.
First of all, it’s a good idea to include the number of revisions or edits you are offering as part of the normal project scope. It’s quite ordinary to make at least one round of revisions part of the work contract (to be done within a certain amount of time after delivery, of course).
However, for anything beyond that, it’s good practice to establish additional estimates to any changes from the clients’ side. It’s absolutely reasonable to change your price or quote a higher estimate if asked to perform additional duties.
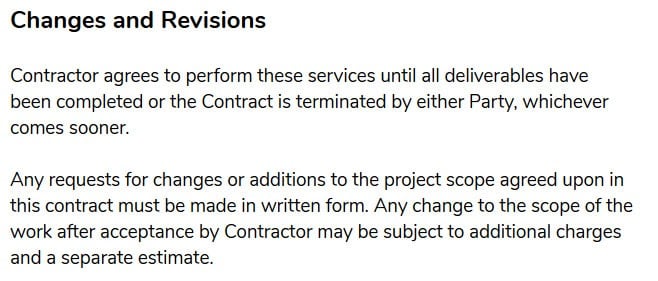
In addition, make sure to include a statement that payment is due for all and any work already performed at the point the client decides to change the agreement.

You can also be a bit flexible here. As already mentioned, if the client asks you to do something that doesn’t require a lot of time and energy and your relationship is good, you might just throw it in for free.
However, for cases where someone asks for major changes to the initial agreement after you have already started working on it, you need to have clear-cut rules.
6. Deal With Copyright
Copyright is a complicated issue and will differ depending on which country you are in. For example, in the United States, unless specifically defined in the freelance contract, the copyright remains with the creator of the work, not the one who commissioned it.
Since, in most cases, the work is intended for the usage by the person who paid you to create it, it’s a good idea to put something about this in your freelance contract template. For example:

If you don’t, when a client knows about this rule, at best, you look like you don’t know what you are doing. At worst, you seem like you are trying to trick them.
Of course, copyright should only change owners after payment has been made. Plus, it’s a good idea to include one exception: reserving the right for you to use the work as part of your portfolio (with the permission of the client, of course).
As a freelancer, showing off what you have already done is vital to find more clients. Therefore, it’s definitely a good idea to add a statement that allows you to use the work for your portfolio or even as part of your content marketing strategy.
Here’s an example:

7. Establish Confidentiality
In the course of working with clients, you may have access to confidential information. This could be a list of their customers, website stats, internal strategy, and other things they might like to keep private.
If that is the case, clients would probably appreciate it to have some sort of nondisclosure agreement inside the freelance contract:
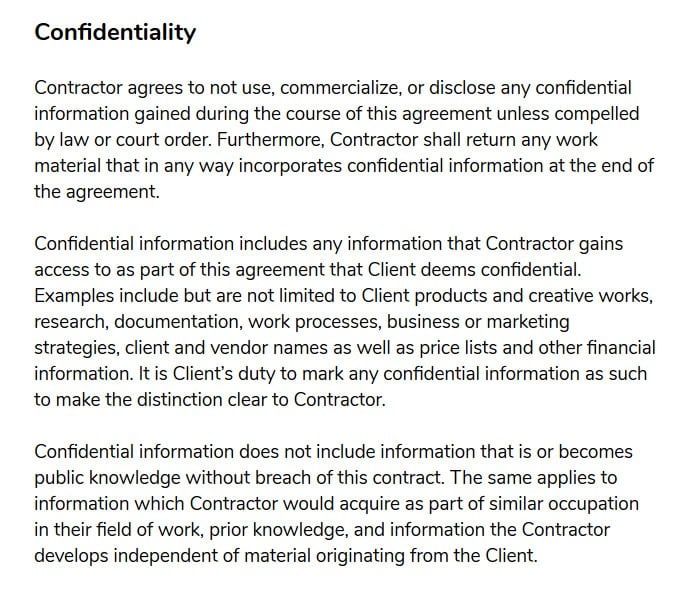
While this may not apply in all cases, it’s still a good thing to have in your freelance contract template for those times that you need it.
8. Arrange Payment
Payment is one of the most central issues of any freelance contract. You want to a) make sure you get paid and b) do so quickly and in the most uncomplicated way.
Just like regular employees, you have financial obligations like rent, utilities, a PlayStation Plus subscription (or is that just me?), and other bills. To make sure you can fulfill these on time, you need to include clear payment terms in your contract, including:
- Amount and currency in which you will receive your funds
- Time of invoicing
- Time of payment (e.g., time of the month, days after receiving invoice)
- Reimbursement for expenses
- Deposits and retainers
- Late payment terms
The first thing here is to choose between hourly payment vs project fee. If you can’t say the exact amount, putting limitations in place can be relief for the client, such as a minimum and maximum hours clause.
As for the time of invoicing and payment, make sure to pick a timeframe that fits the project and your financial obligations. That way, you have the ability to plan with regular income and keep control of your budget.

Many freelancers also ask to be paid upfront, at least in part, which is a great way to ensure cash flow for longer projects. Plus, again, this helps qualify clients as asking them to put skin in the game.
Down payments are usually at least 50 percent of the expected fee, especially with first-time clients. Other common payment schedules are 40/40/20, 30/30/40, and 25/75. You can also work until the deposit runs out and then ask for the rest as a milestone.

In addition, any and all late term fees should be mentioned under payments. It’s absolutely within your rights to charge a percentage of your fees if the payment is late by a certain amount of time.
In addition, if there are any job-related expenses (like a WordPress plugin you need to purchase to review it), make sure to include a clause that you will need to be reimbursed for them.

Finally, you have the ability to list acceptable payment methods in this section (Direct debit, PayPal, credit card, Transferwise, etc.).
9. Don’t Forget Contract Termination and Kill Fees
Including a termination clause gives both parties the ability to end the work relationship. If you don’t have clear rules for that in place, it’s up to the client’s whim and they can fire you anytime they want.
That’s not really the best of situations to be in, wouldn’t you agree?
Therefore, a solid termination clause can give you more time by demanding notice ahead of time.
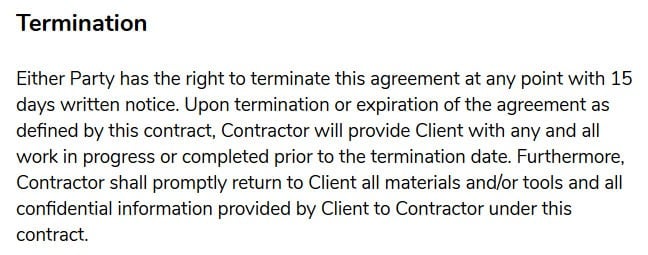
However, this is not just for relationships gone sour, but also for long-term projects that are just naturally coming to an end.
For those cases that, for whatever reason, you and the client need to part ways before, it’s important to include some sort of ruling that also gets you paid for the time invested.

This is also called a kill fee or cancellation fee. One way to do this is to make the deposit non-refundable so it serves as a basis for the cancellation fee plus any additional work fees.
A breach of contract on either side (through non-payment, missed deadlines, breach of confidentiality) can also be cause of termination if so agreed on.
10. Protect Yourself Legally
A huge part of using a freelance contract template for client work is to protect yourself from unwanted legal consequences.
For example, something that should be part of pretty much any contract (but that, as a non-lawyer, you might not be aware of) is a severability clause. It basically states that, if any part of the contract becomes invalid (due to a legal technicality, for example) that does not affect the rest of it.

By including this, you don’t risk your entire freelance contract falling apart because of some tiny mistake.
Likewise, it makes sense to include a Force Majeure clause. Sometimes things happen that are outside of the hands of either party, like a natural disaster, pandemic, family emergency, etc. In that case, you don’t want to have to deal with the legal hassle because you technically breached the contract. That’s what that clause is for.
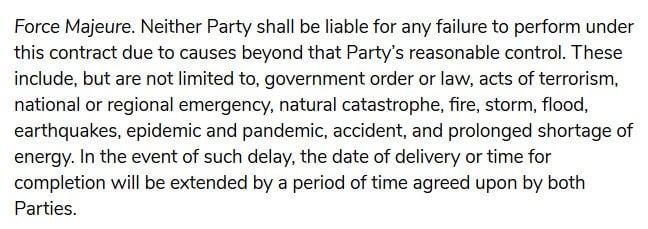
Also, for tax reasons, some clients want the contract to make clear that you are not entering into an employer/employee relationship, but that you are an independent contractor.

Also, you might want to settle on the law of which location will govern the contract. This is where you will take legal action in case it becomes necessary. This is usually the country of residence of the contractor.

Another option to include is an indemnity clause. This helps protect you from taking blame for bad things that happen on the client’s side when they use your work.

Finally, you should include a provision that states that there are no side agreements between you and your client outside of this freelance contract and that any changes to it need to be agreed upon in written form.

You might not need all of these (except for the severability clause, which is mandatory), but you should be aware of these options.
11. Add Signatures
No contract is complete without the signature of both parties. Adding them means each of you have read and agreed to the proposed terms.
In order to get your client to sign, it’s best to first send over the contract for them to review. Then, if they have any amendments or changes, you can talk about them.
Once ready to put the signature on the dotted line, you and your client have several options to do so:
- Digital signature services (e.g. Bonsai, Docusign, Eversign)
- Do it directly inside a Google document
- Print, sign, scan, and email
- Print, sign, and send it via regular mail
Be sure to include the date of signature! Plus, wait for the client to sign first before co-signing. Finally, be sure to send them a copy with both signatures and save one in your files.
That’s it. Well done!
Download Our Free Freelance Contract Template
Phew, that was a lot, wasn’t it? The topic of contracts can be confusing and scary, especially for first-time freelancers. Hence why we are writing this post in the first place.
However, if you still feel apprehensive about creating your own freelance contract even after reading all of the above, we have created a downloadable free template with all of the above already filled in that you can adapt to your own needs.
Click here to access the free template (no opt-in or email address required).
Just a quick disclaimer reminder: While we have done our very best to put together the best freelance contract template we could, nobody here is a lawyer. Therefore, you should not treat this as legal advice of any kind. At the same time, the template is the result of years of experience working with freelance clients and after doing the best research we can. So, we are pretty confident about it.
Everything You Need to Know About Freelance Invoices
Alright, I know the contract thing was a little much. However, it was necessary to go over it in detail because it’s such a complex topic. The other two parts about invoices and taxes will be shorter, I promise.
Let’s deal with the former first.
Freelance Invoices – Why They Matter
Another difference between freelancers and full-time employees is that, as the former, you don’t get a paycheck. There’s no money that automatically and regularly appears in your account at the end of the month. Instead, you need to invoice your clients to get paid.
In this part, we will go over how to write proper invoices to your freelance clients so everyone, including the tax authorities, are happy.
Small caveat: Invoicing practices are not the same everywhere and also sometimes differ depending on your industry and type of business.
While we will go over the basics, which are relatively universal, for the specifics, you may want to do some research. A Google search for “invoice requirements [your country/state]” or “how to write a [your industry/business] invoice” usually does the trick.
How to Make an Invoice That Holds Up to Scrutiny
First of all, there are several ways to create a freelance invoice. You can do it with a word processor like Google Docs, OpenOffice, or Word. Google Sheets or Excel can work, too, if you prefer spreadsheets to documents. You can also find freelance invoice templates online if you’d prefer to go that route.
Another option is accounting and online invoicing software like FreshBooks, Stripe, or Quickbooks that can create (and sometimes send) invoices for you. What’s more, payment processors like PayPal often have email invoicing built in.
As to when is the right time to invoice your clients, you might do it after the contract is fulfilled, when reaching an agreed-upon milestone, or as part of your regular schedule.
For example, I send all my invoices at once on the first Monday of the new month. This allows me to batch them and save time, it’s also easier to keep an overview. You can come up with your own invoicing system.
Generally, as will become clear, your invoice should reflect your agreement with the client. So, let’s talk about what that looks like.
1. Include a Header
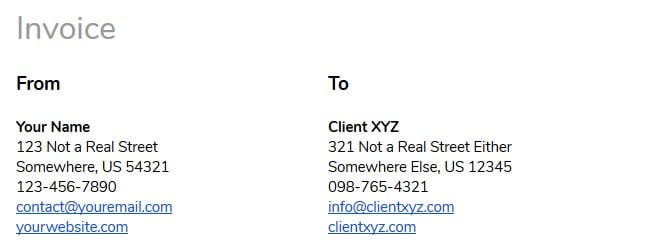
Just like a contract, a freelance invoice needs some introductory section with basic information of the parties involved in the transaction. In your case, that means:
- A logo, if you have one
- Your freelance business name (if don’t have that, put your own name)
- Contact information (address, phone number, email, tax ID, or any other relevant information)
In short, very similar information as you would put on a business letter. In the same vein, be sure to use a pleasant, easy-to-read font and slightly larger size or bolding to make your info stand out.
Continuing with the notion of the business letter, the next section of the invoice will list the party being invoiced. Here, too, you will include similar information:
- Business name or client’s name
- Contact information
If you don’t know what to put here, contact the client and ask. This is important because especially larger companies often have specific practices for invoicing or a certain department or address the bill needs to go to.
Finally, if you use them, you can also add a customer account number. This is some unique id that you can include on every invoice for this client. It makes grouping invoices easier as well as following up on their payment history. Yet, this part is optional.
2. Include an Invoice Number
What’s not optional, however, is the invoice number. For tax purposes, this needs to be unique to every invoice you send out (so authorities know which payment belongs to which invoice). It’s also for you to keep track.
How you come up with that number is up to you. There are different systems you can use:
- Simply start with “0000001” and start counting up
- Use a mix of the customer number and date of invoicing, e.g. “17-040419” for an invoice sent on April 4, 2019 to client number 17
- Put the year, month, and running number at the end (that’s what I do), meaning “200532” for the 32nd invoice of the year issued in May 2020
- You can even use letters, like an acronym for the client name. As an example, for my invoice to Smart Blogger for this post, I might use “SB0001”.
In short, the system is really your choice. You only need to make sure to stay consistent and that you use a running number. If it’s not sequential, tax authorities sometimes assume that you forgot to hand in one of your invoices because the numbering has gaps. Disproving that is not a position you want to be in.
3. State the Invoice Date and Billing Period
The invoice needs to be dated and it’s also useful to include the billing period (in fact, both are mandatory in some places). Again, it makes for easier tracking. Plus, when you have an invoicing date, that’s what you will refer to when enforcing payment terms (more on that soon).
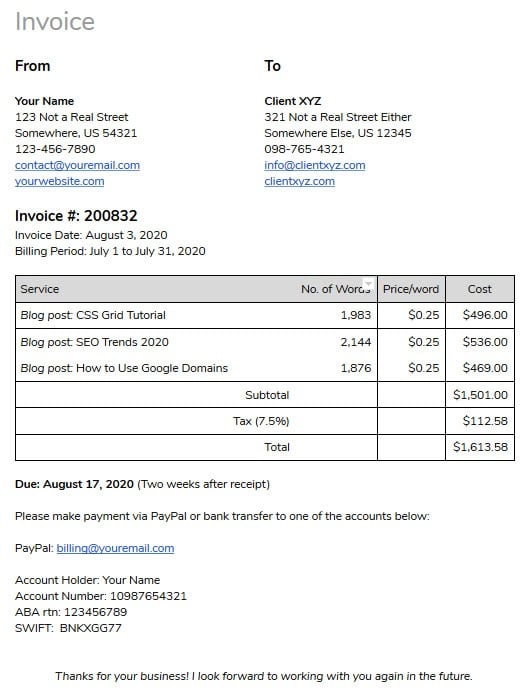
Simply include the invoice date at the top somewhere. If you write regular invoices as part of your freelance work, like once a week or month, the billing period is between those dates. Here’s what everything looks like together so far:

The formatting is somewhat up to you. If you are the creative kind (and why wouldn’t you, being on this site?), you can play with different designs. The most important thing is that all the information is there.
4. List the Services Rendered
A central part of any freelance invoice is a list of the services you provided for which you want to get paid.

This tells your client how much they owe you and why. Here are relevant line items you’ll want to include, depending on your service:
- Date — The time when you performed your service, e.g. a photoshoot. This is especially important if you have an hourly rate and get paid by the hour. Should you receive a lump sum per month, you can omit this.
- Type of service — List what you did for the client. This can be “web design”, “social media consulting”, “wedding photography”, or similar. Make sure it fits your job title. Tax authorities will arch an eyebrow if you are registered as a translator, but write an invoice for landscaping.
- Number of hours/items — If paid hourly, detail how much time you spent on a particular date performing your service. Alternatively, if you agreed on a per-item charge (like, per WordPress template or per word), list them here.
- Hourly/item charge — How much you charge per hour/task/item for that particular service.
- Other charges — If any other charges apply, like shipment fees (e.g. for hard copies of photographs), material, or expenses (like printing costs), include them as well. However, you might have to check with an accountant about taxing those for your particular profession.
- Total amount due — In the furthest right column, total up the charge by multiplying the number of hours/items with your hourly/per-item charge (I didn’t really have to explain that, did I?) and add in your other expenses.
- Conversion — If working with an international client, you might include the exchange rate you used and the total in your agreed-upon currency.
5. Calculate Subtotal, Taxes, and Total
Now it’s time to sum everything up.
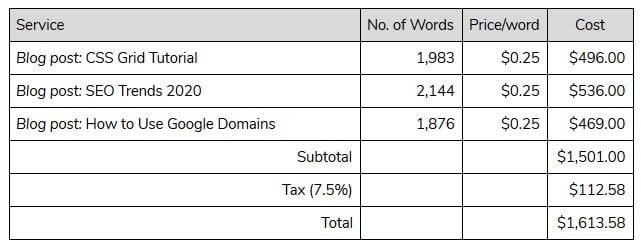
Below the list of your services rendered, create the subtotal by tallying up what you have so far.
On top of that, you now have to add taxes, which usually means sales tax. Here’s where it gets a bit complicated because the tax rate and how and whether to apply it depends on many variables such as your location and type of freelance business.
Therefore, at this point, you have to do some digging about local laws, either online, by calling your local business association, or speaking to an accountant.
You should end up with a percentage that you can also include on the invoice. Multiply the subtotal with its decimal representation, round off as needed, and add to the subtotal to get the total.
List all of that on the invoice as shown in the screenshot above.
6. Don’t Forget Your Payment Information and Terms
In order to get what you are due, important information to give your clients is how they can pay you. We have already dealt with this in the contract section, so you probably already have an agreement.
However, whether you accept bank transfer, credit card, PayPal, or some other payment method, you need to give clients a place to send the money. This can take the form of your account information, PayPal ID, etc.
Another thing that’s already part of the contract, but bears repeating, is when the client needs to pay. This is often represented with a due date or payment terms.

This should be in accordance to the contract you both signed before starting to work together. You can also re-stipulate any late fees that will apply for non-payment (20 percent is a typical number here).
Site note: To avoid confusion when invoicing internationally, it’s a good idea to use this date format: April 21, 2020.
7. Include Other, Optional Information
Here are some other things you might want or have to include on your freelance invoice:
- Tax number/ID — In some places, such as the European Union, you need to include a tax ID of both yourself and the client for B2B transactions.
- Legal statements — There might also be need to include some legal information, such as the waving of VAT when dealing with clients overseas (see “reverse charge”).
- Client requests — Different clients might have their own requests as to what kind of information they need on the invoice. For example, they might need you to specify your services as “editing services” or something that they can claim for their tax authorities. Check with the client if they have any special requirements.
- Thank you message — There’s no law that says you can’t send a personal thank-you note or some other friendly message as part of your invoice. It’s a great opportunity to show some extra effort. Some people also use this to market follow-up work by including a coupon, or cross-selling other services, so be creative.
8. Send the Invoice and Follow Up
Once finished, it’s time to send the invoice to the client. Depending on the way you have chosen to create it, this might look slightly different:
- Create and download it as PDF (so the client can’t alter it)
- Hit “send” in a payment processor interface
- Print and send over a paper copy via regular mail, etc.
(In the latter case, it’s best to use a service where the client has to sign for it so that there’s a paper trail and they can’t claim they didn’t receive it.)
When sending via email, put the invoice number in the subject line so it will be easy for them to find again.
The important thing is that it goes to the right addressee. If you are not sure, ask the client which email address (or physical address) they prefer you use. They might have a financial department that’s responsible for paying and might want you to send it to them directly.
After that, make sure to check your account regularly to see if the money has arrived. When it’s past the terms you specified, send a reminder for late payment.
If stipulated in the contract, you may also add late fees. Though, in the interest of a good client relationship, it makes sense to first send a reminder without any additional fees. It might just have slipped their mind.
However, if it continues, you need to decide for yourself how many late payment notices you send before you turn it over to a collection agency or lawyer.
9. Keep Copies!
Once you have sent your invoice, be sure that you keep a copy. Some people print their invoices and file them away physically. If you want to stay digital, be sure to keep copies in more than one location. For example, creating a cloud backup that automatically saves them from your computer is a good idea.
That’s it.
You are now familiar with the workflow of creating a professional invoice to get paid for your services. In addition, once you have created a freelance invoice once, you can use it as a template for all subsequent ones.
Freelance Taxes 101: The What, When, Where, and Why
They say only two things in life are certain: death and taxes. While we can’t do anything about the first, we can at least help you be prepared for the latter.
The same applies with taxes as it did with invoicing: We will go over all the important stuff; however, the details might differ depending on where you are located.
Therefore, you can use this as scaffolding, but it’s still important that you do some of your own research to confirm. When in doubt, reach out to an expert.
Freelancers vs Self-Employed – What Are You?
The first thing to notice is that, as a freelancer, the Internal Revenue Service (IRS) considers you a (small) business owner. The term “freelancer” doesn’t exist in tax parlance. Instead, you usually fall under two different terms:
- Self-employed — You work for yourself and are not considered an employee.
- Independent contractor — This is someone who provides goods and services under a contract or other agreement to another party.
Of course, there is lots of overlap here. Almost all independent contractors are self-employed but not all self-employed people are independent contractors. Many freelancers are both.
Either way, being your own boss has consequences for filing federal taxes. For one, you can get additional deductions, mostly in the form of business expenses. On the other hand, you also need to pay additional taxes, most prominently self-employment tax as well as local and state taxes. We’ll get into that in detail below.
Freelance Taxes Good Practices
In order to do your taxes, there are a few good practices to follow to make things easier on yourself in the long run:
- Keep things separate — As soon as possible, separate your business from your personal finances. That means separate bank accounts. Don’t pay personal expenses with your business bank card and vice versa. It just makes things more complicated.
- Keep track of your finances and receipts — Track your income and expenses (you can use accounting software to make it easier). Make sure to get and (digitally) save printed receipts for all business expenses, including and especially when paying or being paid in cash. Plus, make a note on receipts that are not clearly business related (e.g. restaurant bills) so you can claim them later.
- Get a tax ID — While it’s often possible to earn freelance income as a natural person (e.g. with your social security number), you are usually better off registering as a small business entity. In the US you can do that by applying for an EIN (Employer Identity Number). Get it for free via the IRS homepage. In other locations, such as the EU, you will get a tax ID, which has the same function.
- Save money — Unlike employees, who pay withholding taxes automatically during the year, you need to pay all of them at once at the end. For that reason, it’s a good idea to put away 25-35% of every invoice into a savings account to be prepared for that.
- Work with a tax professional — This seems weird advice in a post about how to do your own freelance taxes, but the truth of the matter is that, if you have the possibility, get someone whose job it is to do your taxes, like a CPA. This is literally the first thing I did when I started earning good money. While you have to pay them, it saves you hours of time, headaches, and usually results in lower tax liability (or even a return) than doing it yourself. Plus, it frees up time to earn additional money.
Important Forms
When doing freelance taxes in the US, it’s important that you know the most important forms:
- Form 1040 — The form used to file an annual income tax return.
- Schedule C — This is the central document for all freelance income and expenses. Here’s where you declare all earnings and any deductions you want to claim and attach it to Form 1040.
- 1099-MISC — You should receive these from every client who paid you more than $600 in a given year. It reports how much they paid you and you should usually get them around January or February. For those that are under that amount, you still need to report the income you generated from them (more on that below). Also if you subcontract work and pay someone more than $600, you need to send your own forms (including copies to the IRS) by February 28.
- 1099-K — If a client only pays you through PayPal or other online payment systems, you might get this form instead. However, they are only required to send it when they pay you in excess of $20,000 and more than 200 times during the year. Therefore, if you don’t receive it, you must declare the earnings yourself.
- Schedule SE — The form where you report (and calculate) the self-employment tax. Gets attached to Schedule C.
Self-employment Tax
Speaking of the devil, as a freelancer, you have to pay an extra tax, the self-employment tax of 15.3%. Before you cry injustice, these are the expenses for social security and Medicare taxes that employees have taken out of their paycheck automatically. The self-employment tax is just a different way of leveraging it from freelancers.
However, unfortunately, as a self-employed person, you have to pay both the employer and employee part of it (because you are considered both). So, it’s a bit of a disadvantage for you. The silver lining: the employer portion is tax deductible!
Tax Deductions
Of course, when doing taxes, the goal is to reduce your tax liability to a minimum. While it’s fair to pay your share, you don’t want to pay more than is necessary. The good news is that, as a freelancer, you can claim a lot more deductions than a regular employee.
Immediate Costs
Any operating costs that are “ordinary and necessary” (this is the official phrase) for running your business can be claimed as expenses and calculated against your revenue, including:
- Food and travel — When going places for work or having business meals, you can deduct those expenses, at least partially. You can also claim car costs (gas, oil changes, registration, repairs, insurance) if you drive for work. However, for that you need to either track the business mileage or percentage that you use your car for business purposes (whatever gets you a better outcome).
- Office expenses — If you rent an office somewhere, you can claim the rent as a business expense. However, even when working from home, you can claim rent, utilities, and Internet costs for the part of your house that you use for work as business expenses (home office deductions).
- Education and certifications — If you are learning things related to your profession and spend money on books or online courses, these are also things you can write off. Same for any licenses or certifications you need and/or acquire.
- Advertising and marketing — Anything you spend on advertising your services, product, or whatever you are selling is tax deductible, including hosting for your website.
- Equipment and material — Things you need to buy to do your job are also a business expense, including a computer (pay attention to the information further below), office supplies, software, or whatever other tools you need to provide your services (e.g. grammar checkers).
- Health insurance — In certain cases, it’s possible to deduct part of your and your spouse’s and dependents’ health coverage from your taxes.
Over Several Years
For more expensive things like computers and other electronics, the IRS usually asks you to deduct them over their useful lifetime. That means for a computer that is expected to be useful over three years, you would claim a third of its price per year over that timeframe.
However, there is a business tax break called Section 179 Deduction. It allows you to deduct the full amount of depreciable expenses in the same tax year up to a certain limit.
The catch with all of these deductions: you need to prove them. Therefore, as mentioned, it’s important to document all of your expenses by saving receipts and invoices.
How to Pay Taxes as a Freelancer
Alright, with all of that out of the way, let’s talk about how to actually do taxes. First of all, the best way to prepare for your taxes is to follow the good practices above. This will put you into the position that you will have most of your ducks already in a row when the time for tax season comes around.
Estimated Taxes
When talking about taxes, most people probably think of the tax declaration at the end of the year. Especially those who have been employees all their lives, because that’s all they know.
However, freelancers often also need to pay taxes during the year. That’s the stuff that is usually taken out of the paycheck of those working for the man.
As a freelancer, if you have more than $1,000 in taxes owed in a year, the IRS requires you to pay partial payments every quarter. These are so-called estimated taxes that are due on these dates:
- April 15
- June 15
- September 15
- January 15
That’s why it’s so important that you keep track of your income and profits so you know how much to send the Internal Revenue Service each quarter.
By December, the IRS wants to see 90% of the taxes owed in their account or 100% of last year’s tax liability. If you don’t do this and it turns out you should have, the IRS will put late payment penalties on top of what you owe.
Underpay and you will have to make up the difference when handing in your yearly tax return. If you overpay, you get the extra money back.
Form 1040-ES can help you ballpark estimated taxes based on your taxable income projections. Alternatively, take last year’s tax liability (the amount you paid in taxes in the preceding year) and pay the IRS the same number. This is usually the simpler solution (unless it’s your first year paying).
By the way, you can also pay estimated taxes early. If you find yourself flush one of these months, go ahead and do it. The IRS doesn’t mind if you pay early, only if you miss the deadline.
As for how to make your tax payments practically, you can find all the options here.
Paying Year-End Taxes
Aside from estimated taxes, like everyone else, freelancers must file an annual tax return. The deadline is April 15 in years without a global pandemic. In 2020, it was moved to July 15.
Here’s what you need to do:
- Collect all your income statements — The first step for that are the 1099-MISC forms your clients should send you. However, as mentioned, this only applies if you billed them more than $600 in the past year. Anything less than that is up to you to track and declare. That’s also why you should have a running number for your invoices, remember?
- Collect expenses — Now it’s time for the other part of the equation. Gather all of the expense statements. If you followed our advice, they should already all be in one place.
- Fill out Schedule C/C-EZ — Follow the instructions of the IRS to fill in this form. Record your business income and deductions you want to apply. Transfer the figure for net profits to the appropriate line in Form 1040.
- Determine self-employment tax — Fill in Schedule SE to find out your tax burden as a freelancer. Transfer this number to Form 1040 as well.
- Complete Form 1040 — Fill in the remaining information, attach Schedules C and SE to the form.
- Hand in your tax return — When all of this is done, you file your taxes either electronically or in paper form. You find instructions for both options here.
After that, the only thing that’s left to do is wait for news from the IRS on how much your tax burden is going to be and pay it off. Then, do it all again next year.
Are You Ready to Become a Next-Level Freelancer?
Getting your ducks in a row legally is one of the most intimidating parts of being self-employed. Freelance contracts, invoices, and taxes are like the monsters in the basement that many want to avoid.
However, if you get these areas under control, you will have a better, more stable, and more satisfying freelance career. Guaranteed.
Plus, what with the freelance contract template and detailed instructions on how to write invoices and do your freelance taxes, you really are running out of excuses not to master this part of your business.
When you do, you are much better prepared to kick ass and do your best work. Take action now. You won’t regret it.
What’s the thing that helped you most in mastering the legal side of freelancing? Share your best tips in the comments section below!
The post The Definitive Guide to Freelance Contracts, Invoices, & Taxes appeared first on Smart Blogger.
from Smart Blogger https://ift.tt/2EdJA5o
via IFTTT
No comments:
Post a Comment