I once spent four hours researching a single blog post before I ever wrote a word. This is a common trap for WordPress bloggers who spend hours analyzing competitors just to rank on page one.
That’s why we moved our workflows at WPBeginner to AI-powered briefs. We use tools like SEOBoost for content outlines and AIOSEO for search engine optimization, which helps our writers focus on the expert insights that readers want.
In this guide, I will show you my strategy for using AI to create content briefs so you can grow your blog without losing quality.
Quick Summary
AI-powered content briefs speed up how we create content at WPBeginner. What used to take hours of manual research now happens in minutes, giving our writers more time to focus on adding the insights and personal experiences that readers actually care about.
You can use LowFruits to find ranking opportunities, SEOBoost to create briefs, AIOSEO to write in WordPress, and Uncanny Automator to automate everything. Let AI handle the research while you provide the expertise that makes your content worth reading.
Why Create AI-Powered Content Briefs for Your WordPress Blog?
Creating AI-powered content briefs saves you time and helps you publish better content that actually ranks.
Instead of spending hours manually analyzing search results, AI tools can scan the top 30 ranking pages in minutes and tell you exactly which topics you need to cover.
I’ve found that AI-powered briefs give you something manual research often misses: data-driven insights about what your competitors are doing right and where they’re falling short. This means you can create content that fills those gaps and offers something new to readers.
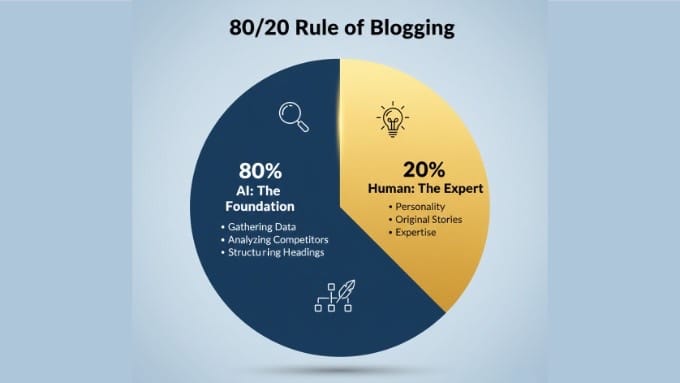
I like to think of this as the ’80/20 Rule of Blogging’. The AI handles the 80% of the work that is repetitive, like gathering data, analyzing competitors, and structuring headings.
This frees you up to focus entirely on the 20% that actually builds an audience: your personality, stories, and expertise.
Here’s why AI-powered content briefs work so well:
- Scale your content production without sacrificing quality – AI handles the repetitive competitor research, freeing up your time to focus on content strategy and creating unique insights that only you can provide.
- Discover patterns humans might overlook – AI can instantly identify ‘People Also Ask’ questions, related topics, and competitive gaps across dozens of top-ranking pages, giving you a complete picture of what searchers want to know.
- Let AI build the skeleton so you can add the expertise – AI-powered briefs provide the structure and SEO benchmarks, while you focus on adding personal experience, original data, and the expert insights that make your content stand out.
At WPBeginner, we use AI-powered briefs to handle the heavy lifting of SERP analysis. This makes sure our writers hit every SEO benchmark while leaving room for the unique expert insights our community expects.
The result is content that ranks well and provides real value to readers.
Pro Tip: In the age of AI Search, ranking on Google is only half the battle. You also want to be the source that AI tools actually quote in their answers. For more on this strategy, see our guide on how to get your WordPress content cited by AI tools.
Choosing the Right AI Brief Workflow
Before you begin, it’s important to understand that there isn’t just one way to build a brief. Depending on whether you’re writing the post yourself or managing a team of freelancers, you might choose a different method.
Each workflow I’ll show you serves a specific purpose in your content creation process. Some help you find ranking opportunities, while others streamline collaboration with writers or automate your entire briefing system.
Here’s a quick overview to help you choose the right approach:
| If you want to… | Use this Method | End Result |
|---|---|---|
| Rank faster by targeting easy keywords | Method 1: LowFruits | A list of keyword clusters and ‘weak’ competitors to target. |
| Outsource to a writer | Method 2: SEOBoost | A professional, shareable URL or PDF brief for a freelancer. |
| Write the post yourself | Method 3: AIOSEO | A pre-structured WordPress draft with SEO benchmarks. |
| Automate a high-volume blog | Method 4: Automator | A system that creates briefs automatically from a simple form. |
I recommend starting with the method that matches your current workflow. If you’re just getting started with content briefs, then Method 2 (SEOBoost) or Method 3 (AIOSEO) will give you the most immediate value.
Method 1: Using LowFruits for Targeted Keyword Insights
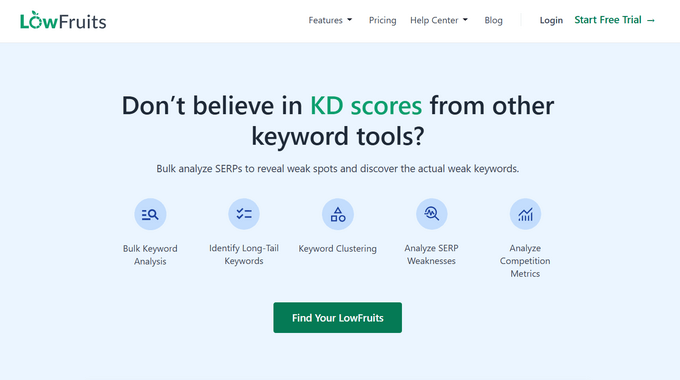
LowFruits, the best keyword research tool for WordPress, helps you find keywords that you can actually rank for. It works by scanning search results to find ‘weak spots,’ like forums or low-authority sites that made it to the first page.
Since these pages are easy to beat, they are the perfect opportunity for you to rank fast with better content.
At WPBeginner, we use LowFruits to identify these content gaps first, and then we feed those keyword clusters into our AI brief tools.
The breakthrough comes when we identify an angle or approach that none of those top-ranking forum threads or competitor articles have covered yet. That’s where our expert insights make the biggest difference.
Step 1: Find Your Weak Spot Keywords
To get started, head over to the LowFruits website and create your account.
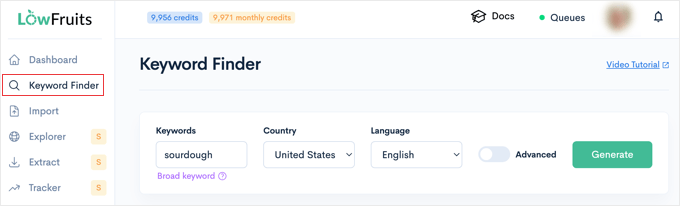
Once you are inside the dashboard, you can simply click on the ‘Keyword Finder’ menu option on the left. On the next screen, simply enter your seed keywords into the ‘Keywords’ field.
If you aren’t sure which keywords to start with, then see our complete guide on how to do keyword research for your WordPress blog.
You can also select a specific country and language if you are targeting a specific audience. Once you are ready, click the ‘Generate’ button to run the report.
The tool will analyze the top search results and highlight pages with low domain authority, forum threads, or user-generated content that are ranking.
Look for keywords with multiple ‘weak spots’ (often marked with a green fruit icon) in the top 10 results.
These results usually come from sites with a low Domain Authority (DA) under 20. Think of these as ‘low-hanging fruit.’
They are your best opportunities because they show that Google is struggling to find high-quality content on this topic, making it easy for you to outrank them.
Step 2: Group Keywords Into Clusters
Now that you have a list of weak spots, you need to group them.
Often, a main keyword and its long-tail variations form a single cluster. While you can do this manually, LowFruits has a feature that does it for you.
You need to click the ‘Clusters’ tab at the top of your report to see your keywords automatically grouped. You can switch between ‘Semantic Clustering’ (based on similar words) and ‘SERP Clustering’ (based on similar search results).
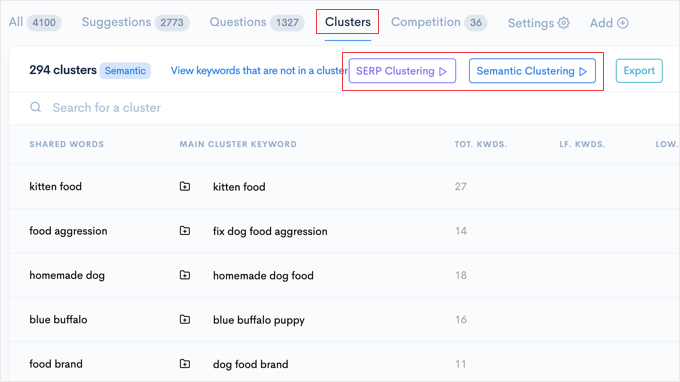
I strongly recommend using SERP Clustering here. In my experience, this is the most accurate way to group keywords because it looks at what Google is actually ranking, rather than just matching similar words.
This saves you from the common mistake of writing two different posts for keywords that Google considers to be the same topic.
Don’t worry if you see clusters that aren’t relevant to your site. You can simply ignore those and click on the name of the clusters that make the most sense for your content strategy.
What’s the Next Step?
LowFruits gives you the raw research and identifies your opportunities. Once you have a cluster of related keywords with weak competition, you can move to Method 2 to turn that data into a professional, detailed brief.
Method 2: Generating Deep Competitive Briefs With SEOBoost

SEOBoost, the best content optimization tool for WordPress, takes your keyword research to the next level by creating comprehensive content briefs based on actual competitor data.
Instead of guessing what to include in your post, SEOBoost analyzes the top 30 ranking pages and shows you exactly what topics, headings, and questions you need to cover.
I recommend SEOBoost when you’re working with freelance writers or need to create detailed briefs that someone else will follow. The tool generates professional-looking briefs that you can share as a link or PDF, making it easy to collaborate.
Step 1: Create a Topic Report
To get started, head over to the SEOBoost website and create an account. You can use their free trial to generate your first few briefs and see how the tool works.
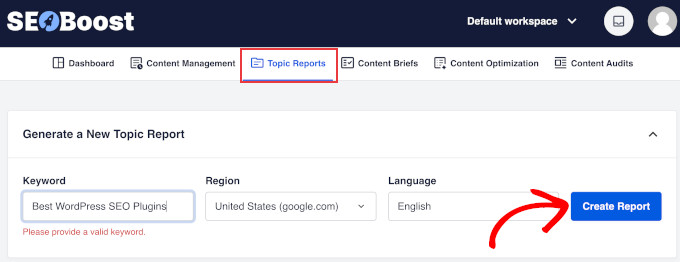
Once you are inside the dashboard, click on the ‘Topic Reports’ tab at the top of the screen.
Here, enter your target keyword. If you followed Method 1, then simply use the ‘Main Keyword’ from your LowFruits cluster here.
Be sure to select your specific language and region (such as the United States), then click ‘Create Report’ to begin the analysis.
The tool will take a few moments to analyze the top 50 search results. Once the status shows ‘Completed’, simply click the ‘View Report’ button to open the detailed data.
Step 2: Build Your Brief Using the Floating Editor
Now for my favorite part: the Brief Builder. Inside the report, go ahead and click the ‘Create New Brief’ button in the top right corner.
This opens a floating editor on your screen, which is very helpful because it lets you build your outline without constantly switching tabs.
Now, you can build your outline without typing a single word. As you browse the competitor analysis, simply click on any heading or text to instantly add it to your brief.
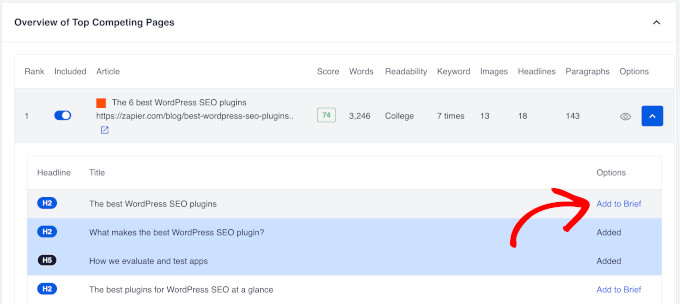
This allows you to pick out the best topics from different competitors to create a superior outline in seconds.
Pro Tip: This is the perfect place to use the ‘Weak Spot’ keywords you found in Method 1. If SEOBoost doesn’t automatically suggest one of your specific long-tail keywords, then you can manually add it as a subheading (H2 or H3) in the brief. This makes sure your writer covers those specific gaps that competitors missed.
You can even organize your outline hierarchy using drag-and-drop. Drag items up or down to reorder them, or drag them to the right to automatically change a main heading (H2) into a subheading (H3). This makes structuring your article incredibly fast.
What’s the Next Step?
Once you have built your outline, click on the ‘Content Brief’ tab to review the final structure. You can drag and drop sections to rearrange the flow.
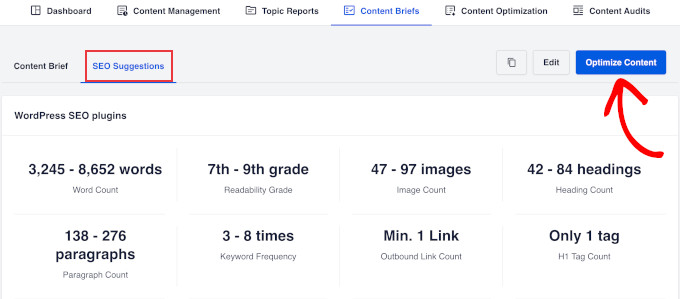
Under the ‘SEO Suggestions’ tab, there is also a handy table with SEO recommendations that gives you a quick overview of what your article needs to rank.
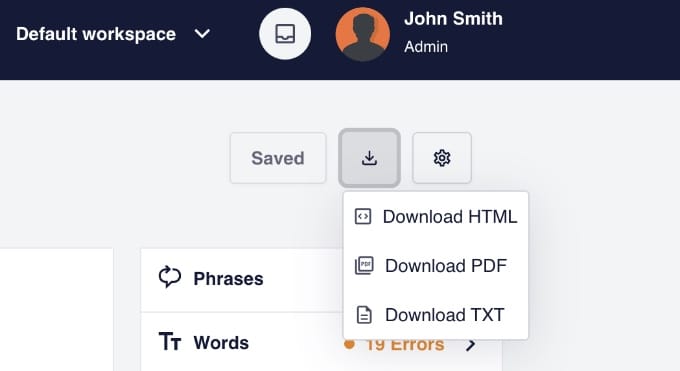
When you are ready to share the brief with your team, you have two options.
First, you can click the download button at the top right to save the brief as an HTML, PDF, or text file. You can share that with the writer via email or some other way.
Alternatively, if you want to paste the outline into Google Docs or Trello, then click the ‘Settings’ (gear) icon next to the download button. From the dropdown menu, select ‘Copy to Clipboard.’
Or if you prefer to write the post yourself, then simply click the ‘Optimize Content’ button to start writing directly in the tool.
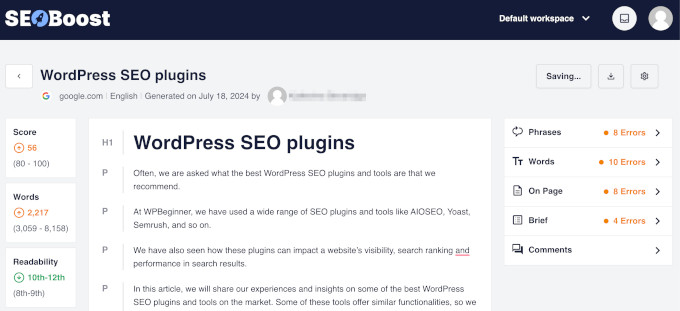
The editor will give you real-time feedback and a ‘Topic Score’ to help you understand if your content is comprehensive enough to rank against the competitors you just analyzed.
Method 3: Refining the Brief Inside WordPress With AIOSEO

If you are a solo blogger or prefer to write your own articles, then I strongly recommend this workflow.
This method gives you the best of both worlds: it pulls the deep competitive data from SEOBoost and displays it directly inside your WordPress editor using AIOSEO.
Instead of switching tabs between a PDF brief and your editor, AIOSEO, the best SEO plugin for WordPress, acts like a ‘Live Brief’. It sits in your sidebar like a personal SEO coach, checking off keywords and topics as you type them.
Note: To use this specific integration, you will need the Pro version of AIOSEO and an account with SEOBoost.
Step 1: Install and Connect the Writing Assistant
This method uses AIOSEO’s SEO Writing Assistant feature. To use it, you will need the Pro version of AIOSEO.
First, install and activate the plugin. For more details, see our step-by-step guide on how to install a WordPress plugin.
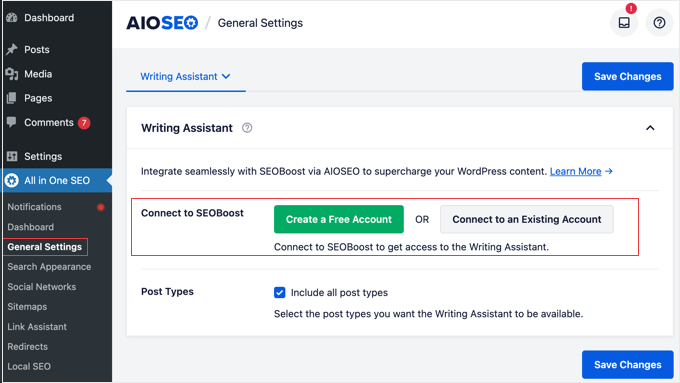
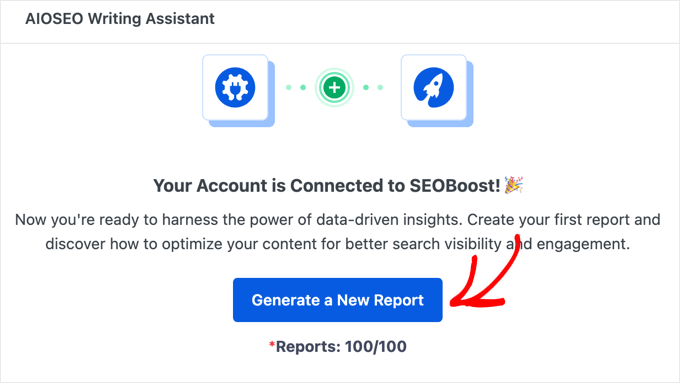
Once the plugin is active, go to AIOSEO » General Settings and click on the ‘Writing Assistant’ tab. Here, click the button to connect your SEOBoost account. This pulls the competitor data into your WordPress site.
Step 2: Set Your Goals (The Brief)
Create a new post in WordPress.
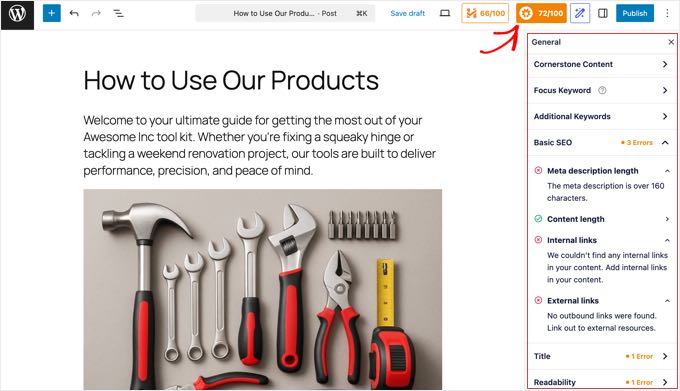
To start your ‘Live Brief’, scroll down to the ‘AIOSEO Settings’ section below the editor and enter your target keyword in the ‘Focus Keyphrase’ field.
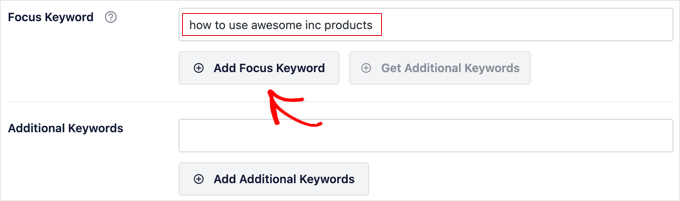
Next, click on the ‘Page Analysis’ section in the AIOSEO settings (or the sidebar) and select the ‘Writing Assistant’ tab.
Then, click the ‘Generate a New Report’ button.
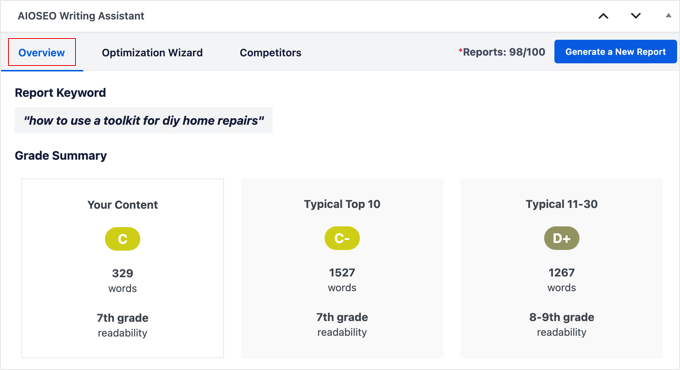
AIOSEO will now analyze top-ranking competitors. It will populate your sidebar with a list of required terms, readability benchmarks, and content length goals.
This effectively sets the requirements for your article before you write a single word.
Step 3: Auto-Generate Your Structure
You can also use AI to build the structure of your post instantly.
Inside the WordPress block editor, look for the ‘AIOSEO Settings’ section below the content area and click on the ‘AI Content’ tab.
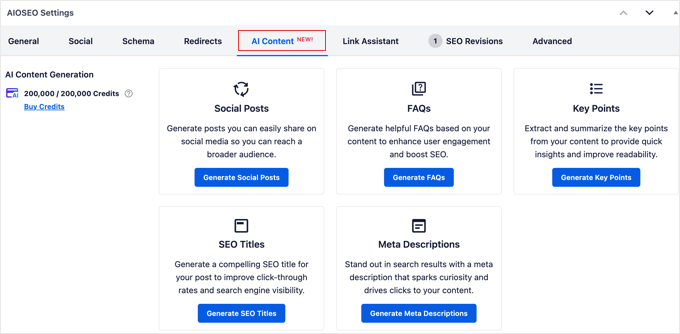
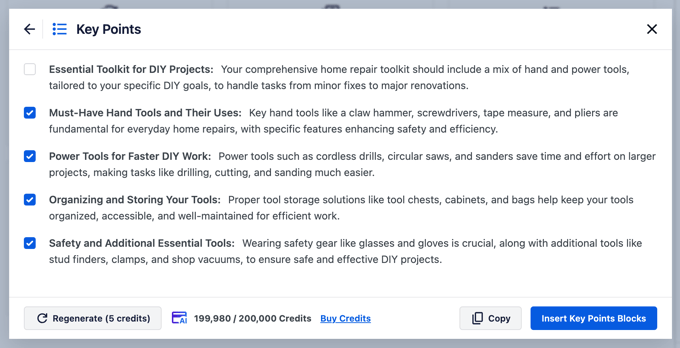
Here, you can automatically generate optimized Post Titles and Meta Descriptions. You can even use the AI to generate a list of FAQs or ‘Key Points’ based on your keyword.
When you find a suggestion you like, you can often add it with a single click. This effectively builds your outline and FAQ section in seconds.
What’s the Next Step?
Since you are already in the editor, just start writing.
As you type, watch the TruSEO Score in the top right corner. It updates in real-time, acting as a gamified checklist to make sure you hit every point in your brief.
For a deep dive into these features, see our full tutorial on how to use the SEO writing assistant in WordPress to improve SEO.
Method 4: Automating Briefs With Uncanny Automator
While tools like LowFruits and SEOBoost are excellent for detailed research, they still require you to open a separate app, run a report, and manually move data into WordPress.
If you manage a high-volume blog or a team of multiple writers, then you need a workflow that stays entirely within your dashboard. This is where automation becomes your best friend.
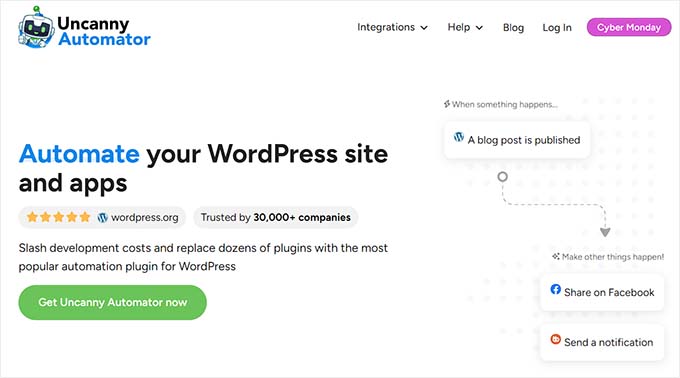
You can use Uncanny Automator, the best automation plugin for WordPress, to turn your WordPress site into a self-operating ‘Brief Factory’. Instead of manually building every outline, you can set up a simple recipe that works like this:
- The Workflow: You create a post, add a title, and assign an author.
- The Trigger: You add a simple tag like
generate-briefand save the draft. - The Result: Behind the scenes, the automation sends your title to OpenAI and pastes a professionally structured content brief directly into your post editor in under 30 seconds.
This method is the best choice for busy editors who want to assign 10 articles in 10 minutes without ever leaving WordPress.
Expert Tip: While this setup is powerful, I recommend testing your recipe on a staging site first. If your prompt is not perfectly formatted, then the AI might return broken HTML that breaks your post layout.
Step 1: Install and Connect OpenAI
To use this workflow, install the free Uncanny Automator plugin. This creates the foundation for your automation. If you need help, then see our guide on how to install a WordPress plugin.
Next, you need to install and activate Uncanny Automator Pro. This is an add-on plugin that unlocks the OpenAI integration and other advanced features.
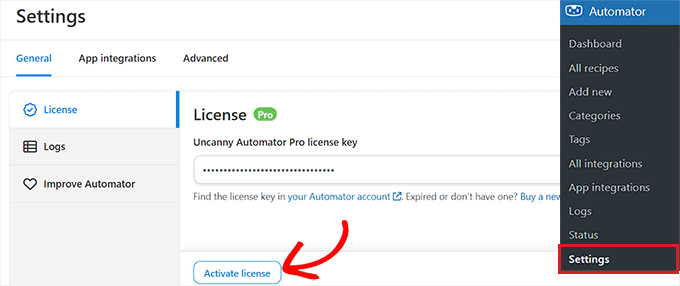
Once both plugins are active, go to Automator » Settings and enter your license key to turn on the Pro features.
Now you are ready to connect your OpenAI account. Go to Automator » App Integrations and select the ‘OpenAI’ tab.
You will need to paste your OpenAI Secret Key here. You can generate one by logging into your OpenAI Platform account and clicking ‘Create new secret key’.
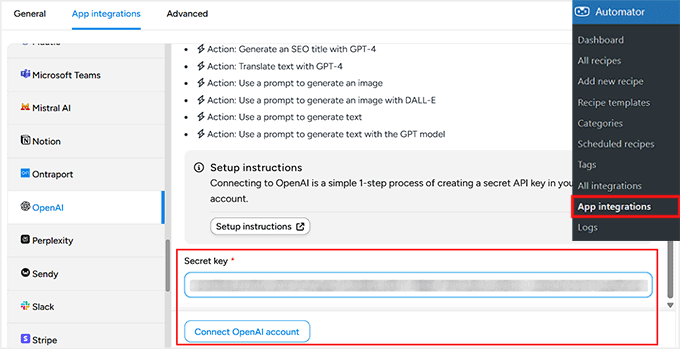
Important: Your OpenAI API account is separate from a ChatGPT Plus subscription. You must have pre-paid credits in your OpenAI billing settings for the automation to work.
Step 2: Create the Trigger (The Tag)
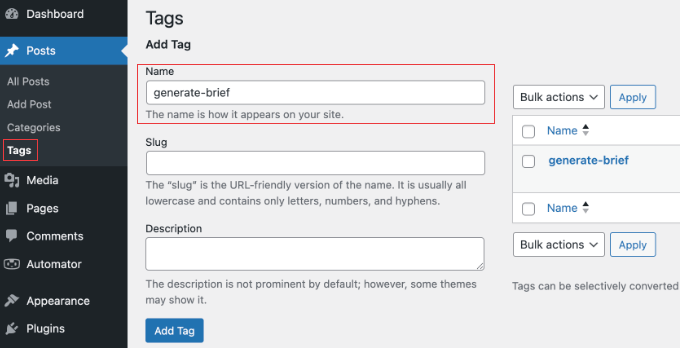
Before you start building the Uncanny Automator recipe, you need to go to Posts » Tags in your WordPress dashboard and create a new tag called ‘generate-brief’.
You must do this first, or it won’t appear in the automation setup.
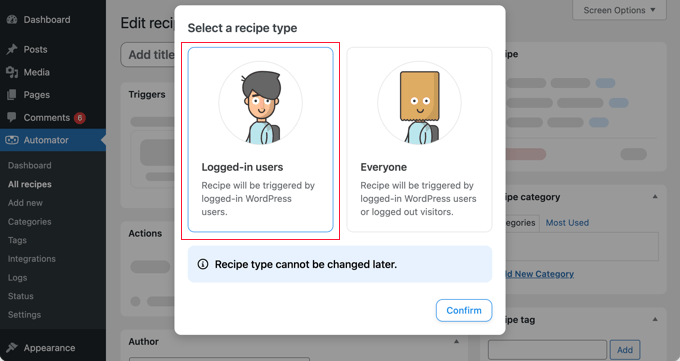
Next, go to Automator » Add New to start building your automation recipe.
You need to select ‘Logged-in users’ for the recipe type, and then give the recipe a title, like ‘Generate Content Brief’.
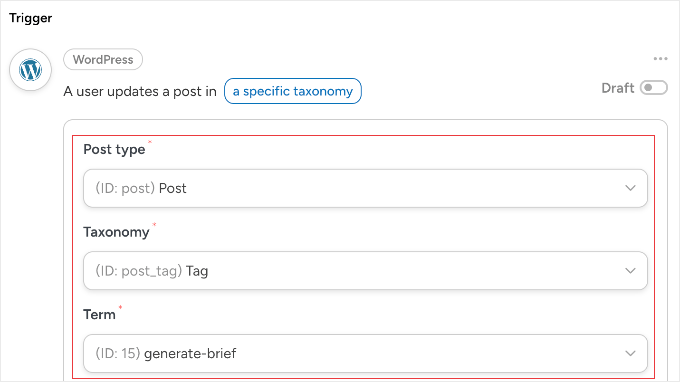
For the Trigger, choose ‘WordPress’.
Now, type ‘update’ into the search bar and select the ‘A user updates a post with a term in a taxonomy’ trigger.
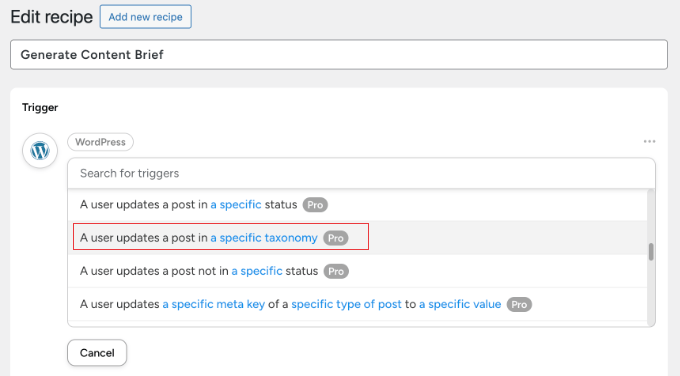
Next, you need to fill out the fields in this exact order. This is important, as the dropdowns depend on each other.
- Post type: Change this from ‘Any post type’ to ‘Post’.
- Taxonomy: Select ‘Post Tag’.
- Term: Select the ‘generate-brief’ tag you created earlier.
Make sure you click the ‘Save’ button at the bottom of the Trigger section. Now, this automation will only run when you add that specific tag to a blog post draft.
Step 3: Configure the AI Action
Now it’s time to create your AI action.
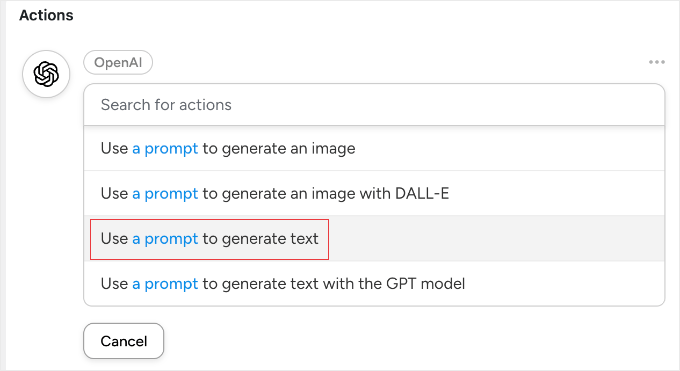
Simply click ‘Add Action’ and choose ‘OpenAI’. Select the action ‘Use a prompt to generate text’.
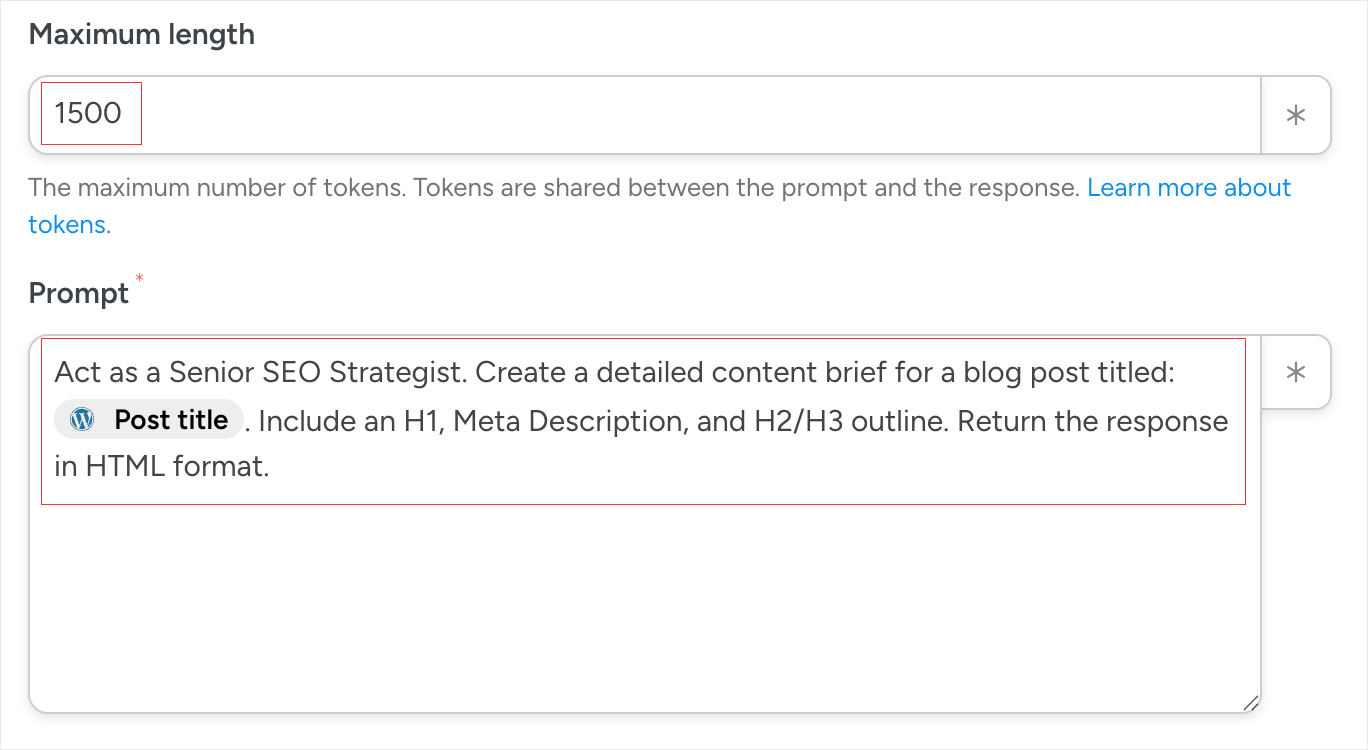
In the prompt box, paste the following instruction:
Act as a Senior SEO Strategist. Create a detailed content brief for a blog post titled: [Token: Post Title]. Return the response in HTML format.
The brief must include:
1. An optimized H1 and Meta Description.
2. A detailed H2/H3 outline.
3. A specific section for ‘Unique Expert Insights’ that distinguishes this content from competitors.
This next step is essential. You need to replace the bold text [Token: Post Title] by clicking the asterisk (*) button. Then you can look under the ‘Trigger’ section and select ‘Post Title’. This makes sure the AI writes a brief specific to your headline.
In the Model field, select the most up-to-date GPT model available in the list. Avoid using older legacy models (like Babbage or Davinci) as they may not format the HTML correctly.
Next, find the Maximum Length field. Change this to ‘1500’ tokens to make sure your outline doesn’t get cut off mid-sentence.
If your AI-generated briefs feel too generic, then try adding more specific instructions to your prompt. For example, you can tell the AI to ‘identify three unique perspectives not found in the top 10 search results’ or specify your target audience demographics.
Now you can click the ‘Save’ button at the bottom of the Action section to finish this step.
Step 4: Update the Post Content
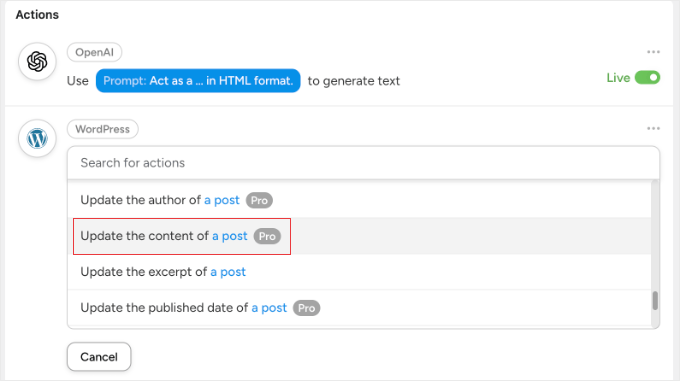
Next, click ‘Add Action’ again and choose ‘WordPress’. Since we want to put the AI’s brief inside our existing draft, select the action ‘Update the content of a post’.
This tells Automator to take the text the AI just wrote and paste it directly into your blog post.
Warning: This action overwrites the existing post content. Make sure you only run this automation on a blank draft, or you will lose any text you have already written.
Configure the fields like this:
- Post: To make this work for every post, scroll to the bottom of the dropdown and select ‘Use a token/custom value’ under ‘Other Options’. In the text field that appears, click the asterisk (*) and select ‘Post ID’ from the Trigger section.
- Content: Click the asterisk (*) button. Under the ‘OpenAI’ section, select ‘Response’. This maps the generated AI brief into your post body.
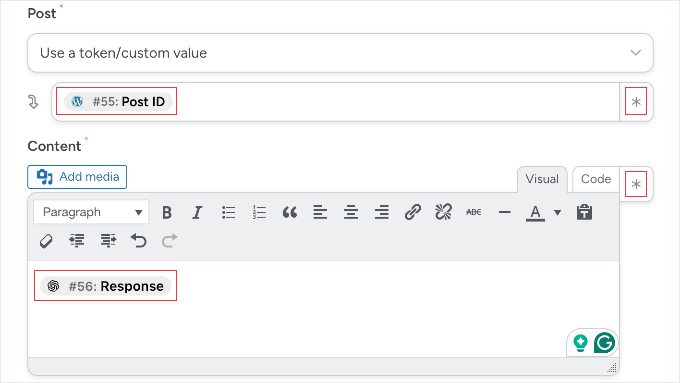
Make sure you click the ‘Save’ button at the bottom to store the new action.
Step 5: Automatically Clean Up the Trigger Tag
If you stop now, then the automation will run every time you save your post with the ‘generate-brief’ tag. To prevent this, we will add a final action to remove the tag once the brief is delivered.
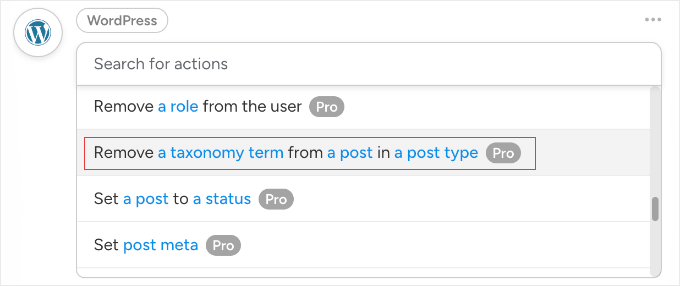
You’ll need to click ‘Add Action’ again. Make sure you choose ‘WordPress’, and then select the action ‘Remove a taxonomy term from a post in a post type’.
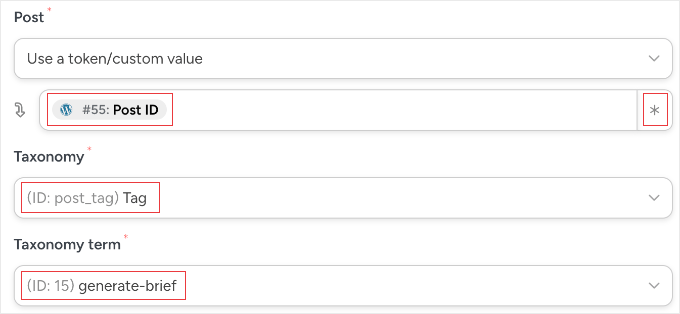
Now, configure the settings as follows:
- Post type: Select ‘Post’.
- Post: Select ‘Use a token/custom value’ and use the asterisk (*) button to select the ‘Post ID’ from the trigger section.
- Taxonomy: Select ‘Tag’.
- Term: Select the ‘generate-brief’ tag.
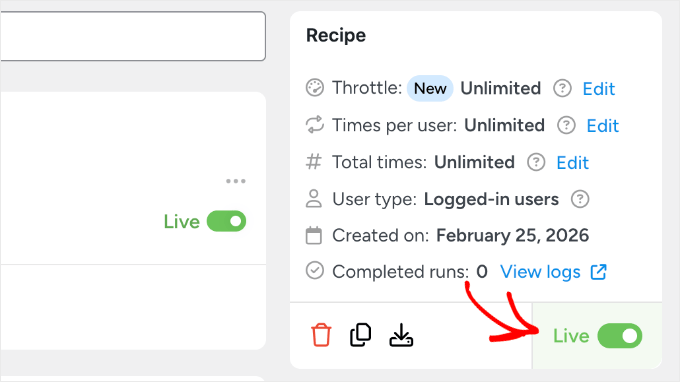
To finish up, you need to click the ‘Save’ button and toggle your recipe to ‘Live’.
Now, as soon as the AI finishes writing your brief, Automator will remove the tag, making sure the recipe only runs once per post.
Pro Tip: While we used a Tag to trigger this recipe, you can customize the automation trigger to fit your team’s workflow. Here are a few other popular triggers you can use:
- The Category Method: Use a ‘Needs Brief’ category. This is great for visualizing your content pipeline in the ‘All Posts’ view.
- The Title Method: Set the trigger to run when a post title contains the word [Brief]. You can then add a final action to ‘Update Post Title’ and remove that word once the AI is done.
- The Form Method: Use WPForms, the best drag and drop form builder for WordPress, to create an ‘Article Request’ form. When you submit the form with a title and audience notes, Automator can create the post and the brief simultaneously.
- The Custom Field Method: If you use Advanced Custom Fields (ACF), then you can trigger the recipe when a specific ‘Generate AI Content’ checkbox is ticked.
How to Use Your AI Brief Generator
Now that your recipe is live, using it in your daily workflow is simple. Here is the exact process an editor would follow:
- Create a New Post: Go to Posts » Add New.
- Set the Foundation: Enter your target headline in the Title field and select the author who will be writing the piece.
- Trigger the AI: In the ‘Tags’ box in the sidebar, type ‘generate-brief’ and press enter.
- Save and Run: Click the ‘Save Draft’ button.
Behind the scenes, Uncanny Automator will send the title to OpenAI, wait for the response, and paste the brief into the post content. It will then automatically remove the tag so the recipe doesn’t run again.
You don’t need to copy-paste anything. Just wait about 30 seconds for the automation to finish, then refresh your browser.
When the page reloads, you’ll see the complete, structured content brief waiting for you in the editor, ready for your writer to start working. It feels like having a virtual assistant working in the background while you focus on other tasks.
Best Practices for AI-Powered Briefs
Creating AI-powered briefs is just the first step. To get the best results, you need to follow a few best practices that ensure your content ranks well and provides real value to readers.
I’ve learned that the difference between a brief that produces great content and one that falls flat often comes down to these small but important details.
Use the Inverted Pyramid Approach
Instruct your writers to put the direct answer in the first 60 words of the article. This ‘inverted pyramid’ structure is important for winning spots in Google’s AI Overviews and featured snippets.
Readers scanning your content should immediately understand what they’ll learn without having to scroll. This means starting with the most important information, then expanding into details and examples in later sections.
Add a Section for Information Gain
AI can analyze competitors and suggest topics, but it can’t create original data or personal experiences. Manually add a section to your brief labeled ‘Unique Data’ or ‘Expert Insights’ where the writer must include something competitors don’t have.
This could be original research, case studies from your own business, screenshots from your experience, or personal anecdotes that illustrate key points. Information Gain is what separates content that ranks temporarily from content that maintains its position long-term.
At WPBeginner, we always include a note in our briefs reminding writers to add their personal experience with the tools or techniques they’re covering. This is what makes our content valuable even when AI tools can generate similar outlines.
Review and Refine AI Suggestions
Never publish a brief without reviewing it first. AI can suggest headings that sound good but don’t create a logical flow, or include topics that aren’t relevant to your specific audience.
Spend 10-15 minutes editing each AI-generated brief to make sure it tells a coherent story. Remove redundant sections, reorder headings for better readability, and add notes about where to include examples or screenshots.
For more strategies on optimizing your content for AI-powered search results, see our guide on how to optimize content for Google AI Overviews.
FAQ About AI-Powered Content Briefs for WordPress
Using artificial intelligence to streamline your editorial workflow often leads to technical and strategic questions. This section answers how best to integrate tools like AIOSEO, LowFruits, and SEOBoost to make sure your automated content briefs lead to high-ranking results.
1. Is an AI-powered content brief different from a standard blog post outline?
Yes, an AI-powered content brief is much more comprehensive than a simple outline.
While a standard outline only lists headings and subheadings, an AI-powered brief includes competitive data, target keyword density, search intent analysis, and specific ‘People Also Ask’ questions that your content should answer.
2. Can I use AI to generate briefs for existing content that needs updating?
Absolutely. Running a new Topic Report in SEOBoost for your existing target keyword shows you how search intent has shifted since you first published the post.
The resulting AI brief will highlight new subtopics or SEO requirements your current content is missing, allowing you to update with precision.
3. Will using AI to generate briefs cost a lot in API fees?
The cost is generally very low because you’re only paying for the specific data processed by the OpenAI API. A typical content brief uses only a few thousand tokens, which costs just a few cents per brief.
4. What should I do if the AI-generated brief feels generic or repetitive?
If a brief feels generic, then it’s usually because the initial prompt or topic was too broad. Seed your AI tool with more specific data, such as a unique target audience or a specific ‘Information Gain’ angle that competitors haven’t covered.
5. Do I need to use all four tools to create an effective AI content brief?
While you don’t need all four, each tool serves a distinct purpose. LowFruits handles keyword discovery, SEOBoost provides competitive data, AIOSEO integrates briefs into your WordPress editor, and Uncanny Automator connects them all to save time.
If you’re just starting out, the combination of AIOSEO and SEOBoost is the most critical.
6. Is using AI for content briefs considered cheating by Google?
No, Google does not penalize you for using AI to plan or structure your content. Google’s primary goal is to reward high-quality, helpful content, regardless of how it was produced. Using AI to build a brief makes sure your content is complete, which actually helps you rank better.
Additional Resources
I hope this article helped you learn how to create AI-powered content briefs for your blog.
You may also like to see some additional resources about improving your WordPress content strategy and SEO:
- How to Add Make.com-Style Automation in WordPress – Explore more ways to automate your WordPress workflows beyond just content briefs.
- How to Get Your WordPress Content Cited by AI Tools – Learn how to optimize your content so AI chatbots and search tools reference your WordPress site as a trusted source.
- How to Do Keyword Research for Your WordPress Blog – This comprehensive guide walks you through finding the right keywords to target before creating your content briefs.
- How to Use the SEO Writing Assistant in WordPress to Improve SEO – Discover how to use AIOSEO’s built-in writing tools to optimize your content as you write.
- How to Optimize Content for Google AI Overviews – Understand how to structure your content to appear in Google’s AI-powered search results and featured snippets.
If you liked this article, then please subscribe to our YouTube Channel for WordPress video tutorials. You can also find us on Twitter and Facebook.
The post How to Create AI-Powered Content Briefs for WordPress – My Proven Strategy first appeared on WPBeginner.
from WPBeginner https://ift.tt/OXJQkbw
via IFTTT
No comments:
Post a Comment